... well, most of the house is a work in progress. But, this time I'm talking about the fireplace. If you've read some of the earlier posts, you'll remember the hidden fireplace... the one that Rick buried in sheet rock to make a wall big enough to handle his plasma television, the one that housed several dead squirrels, the one that looked a little shabby after we finally found it.
You might even recognize some of the following pics:

As we first viewed the "fireplace" back in July...

After we found the hearth... knew it was there because I could see it in the crawl space, just had to remove the carpet and subflooring.

and upon further inspection, we found this...
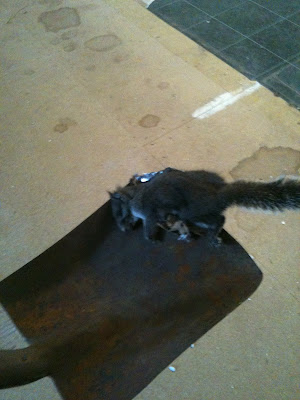
and this...

after cleaning our discovery up, we had this...
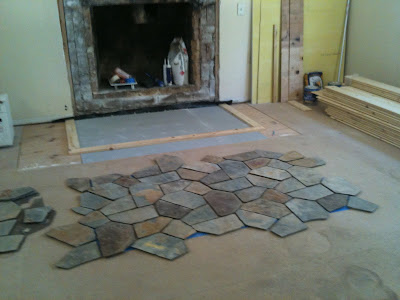
This pic was taken about six weeks after the first pic. Like I said, a work in progress... Preparing to place our own version of a hearth. These stones went down much easier compared to our first attempt, the one that I blogged about earlier.
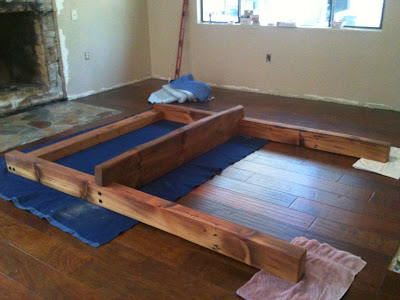
Assembling the posts, beam and mantel... The posts and beam are from the hundred year old barn in Colussa County that Jesse tore down. The mantel is from the hundred year old barn in Corning that Jennifer tore down. I love the character each piece has, but it was very labor intensive to get that character to show. Working with reclaimed wood is not like working with the stuff one can pick up at Home Depot. As wood ages it hardens, twists, bows, and checks... that's fancy talk for the splits and cracks that form as the wood dries out. The posts and beam were straight enough that I could run them thru the planer, but it took seven or eight passes on each face. The mantel was twisted so badly that it had to be hand sanded with both belt and disk sander as well as hand planed using a seven inch block plane. It also had some dry rot at one end that had to be sanded out, but that was rather fortuitous because it allowed me to take liberty with shaping the piece to lessen the twisting. After several hours of rough sanding I had a piece that more closely resembled a slab from mill run than a rough cut 3x12. All four pieces were then finish sanded with first 120 then 220 grit sandpaper. Finally a coat of Watco Oil in a natural finish was applied. Given that the mantel was a different species of wood, fir versus redwood, than the beams I was a little worried that it would take the stain differently. Sure enough, it did. So, the mantel also received a coat of Dark Walnut oil to better match the posts. In the end, the mantel had more of a brown tone while the posts and beam had more of a red tone, but given that the slate and ledge stone we are using in the fireplace vary in color I didn't fret too much.
Hardness and twisting posed additional problems during assembly. The first being the pre-drilling of holes for three-eighth inch lag screws. The wood was so hard that my sharpest 3/8" bit would barely bore thru it. I finally ended up using a 3/8" paddle bit to get the job done... but it took two full batteries for my cordless drill to get the eight holes drilled. If you look closely at the pic, you will notice the black, square head, 3/8" lag screws. I dare you to try to find those at your local Home Depot or Lowes. Oh, they have them, but not in seven inch lengths... I almost bought the off the shelf 1/4" timber screws that Home Depot stocks, but wanted something with a little more heft purely for aesthetic purposes... After scouring the internet, I found The Blacksmith's Depot. They had the screws, albeit not cheap. Anyways, it was again fortuitous that I went with the 3/8" screws because the posts had enough of a twist to them that I had to use the screws to pull them into some semblance of straightness so as to achieve a tight fit with the mantel. As I cranked the screws tighter and listened to the wood protest as the twist straightened, I prayed silently that the head of each screw wouldn't twist off. I'm pretty sure that at least one of the 1/4" lags from Home Depot would have snapped. And that would have been a nightmare to rectify. I don't even want to think about it. After all was said and done, I was very pleased with the results.
Notice the lack of paint on the walls surrounding the fireplace??? That is the result of a lot of scraping to remove up to a 1/4 inch of dry wall mud that was used to tie Ricks drywall job into the then existing drywall. Interesting craftsmanship to say the least. Anyhow, in the above pic one can see a fireplace mantel, the stone hearth, and the existing wall all prepped for installation. There are at least 32 man hours of labor to get to that point... like I said, a work in progress...

Unassembled, moving each piece of the mantel is a one man job... although Caren didn't like the task very much. Assembled, the entire piece is, well, quite heavy. I thought it would have to remain on the floor until I could coax Alex and Zach up to the house under the pretense of a mountain bike trip or something, but our very helpful neighbor, Tom, volunteered to help me step the assembly up into place. Tom, is a contractor and has been doing what I play at his whole life. He makes the hard stuff I do look easy. He made stepping up the mantel assembly easy. We just slid it right into place. I hate asking him for help because it'd be like asking my massage therapist girlfriend for a massage. Just doesn't happen. I'm sure Tom doesn't want to come home from a long day of building sh@t only to have his novice neighbor ask him to help build some sh@t... Anyways, Tom is a great guy and always gives sage advice!

All tied into the wall using more of the black lag screws... which meant more drilling, but less praying because I didn't have to coax anything into place. Caren and I both are digging how the floor, the slate and the beams all compliment each other. There is a piece of the ledge stone on the mantel that will eventually cover the firebox and surround the television box that will sit on the mantel. Oh, the electrical outlet centered above the mantel required more fishing for wires in the wall and climbing around in the attic. This time the fishing was relatively easy, but I smacked my head on a collar tie in the attic hard enough to draw blood. Gawd I hate electrical work.
Still quite a bit to be done on this work in progress, but I'm pleased with how it has turned out so far...
No comments:
Post a Comment