Wednesday, August 31, 2011

Slate Flagstone Flooring

"Basically this stuff is like tile, right?"

"Yup, just lay down the cement backerboard, slap down some thinset and place the mesh backed pieces."

"Easy..."

Not!

Caren found a really good deal on tumbled edge slate flagstone. The stuff comes in a pattern glued to a mesh back. We purchased forty square feet of the stuff for $3 a foot. It was all glued to the matting. We also purchased twenty square feet of loose pieces that had come off the matting for $2 a foot. The loose pieces would help us fill in the edges where the mesh backed stuff would not fit. It would also save us a few bucks...

I removed the 3/8" subflooring and placed 1/4" cement backerboard on top of 1/8" masonite to make a level bed surface. That took most of a Saturday morning. On the following, Sunday, with the help of a borrowed tile saw, we began laying the stone.

Right away we noticed a few problems. First off, the glue used to affix the stones to the mesh caused the stones to stick up at uneven heights. Second, many of the stones were cracked. Guess that's what you get for $3 per foot. We ended up pulling all of the pieces off of the mesh and chiseling the residual glue off the backs of them, and making the best use of our loose pieces to replace the cracked stones. In the meantime our thinset was setting up, and I was beginning to feel very uneasy about the whole shebang. We only set about a third of the entryway before we ran out of weekend, and I knew I was in for a rough week of beating myself up...

I spent the next few days down in The Valley kicking myself for not thinking the whole project through before jumping in. A few hours worth of thought and I would have had a sound plan... instead, we rushed it because we wanted to get the job done before the weekend was over. Anyways, over the course of the next week, I waffled back and forth on tearing out what we had done and starting over and leaving it in and making the best of it.

Part of the problem was tying the stone into the hardwood flooring. Should we butt the hardwood right up against it? Should we use a trim piece to hide the seem? Should we place a frame around the stone and butt the flooring up against that. All three scenarios pose problems...

If we butt the hardwood directly up against the stone we'd need to lay the stone with a perfectly straight edge--no easy task with tumbled flagstone. The stuff is not at all like square pieces of tile. Additionally, our hardwood flooring has chamfered edges, so somewhere in the floor we would have a straight cut that was exposed, one without any chamfering.

If we use a trim piece we can hide the seem easily and eliminate the need for a perfectly straight edge to the stonework, but we'd have a two to three inch wide piece of trim laying above the stonework and hardwood where the two meet. I really didn't like that idea, never mind the trouble matching the trim piece to the flooring.

If we build a frame around the stonework we still have the problem of matching the finish on the frame to the flooring. We also have the chamfering problem the first scenario poses.

What to do...

Without much forethought, we laid the first pieces of stone assuming we would frame it, meaning we left room for the frame between where the hardwood flooring would end and the stone would begin... but, we didn't actually build a sacrificial frame that would keep our edges perfectly straight. Too much rushing, not enough thinking... We ended up with pretty ragged looking edges on the section that we set.

Those were the thoughts that I beat myself up with all week.

After lots of discussion, Caren and I decided that a trim piece would not be so bad, especially if I chamfered it to match the flooring and finished it to match the baseboard and door casing. So, that's what we set about doing on the following weekend.

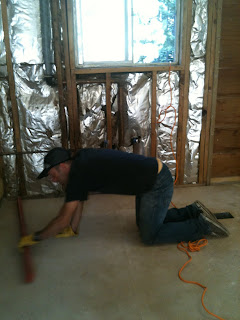
We had to tear up a few pieces of stone that we placed to make the necessary adjustments, and I took a dremmel tool to the ragged edges to straighten them up. Then we placed a sacraficial frame around the whole area we were placing the stone in. Finally, we layed out the entire pattern of stone on the floor next to our work space so that we could quickly place it in its final position once we had thrown down the thinset.

Here I am with a dremmel tool spinning at high rpms in one hand cleaning up the edges of the stonework and a vacuum cleaner in the other catching the dust, and Caren is laughing hysterically behind me... she seems to think that I have done a pretty good job at mastering the whole plumber's helper thing. Maybe I should buy a belt!

I felt much better about the whole kit-n-kaboodle once it had been thought through. Still, it was a tedious process and took us the better part of a morning to get the forty feet of stone in the thinset.

This is what we ended up with after what amounts to three full days of work. The grout is obviously still missing. The frame will be pulled off once the stone has been grouted and replaced with the trim strip once the hardwood flooring has been put in.

Once the thinset was dry, we began our adventures in grouting. After misreading the directions on the bag, Caren had me attempt to mix the whole ten pound bag at once. That would have been great if we had added the grout to water instead of water to grout... and were the world's fastest grouters.

Instead, I mixed and mixed and mixed for over ten minutes and still couldn't get all the powder to mix with the water. I kept pulling more dry stuff up off the bottom of the bucket. We finally gave up and decided to just use what had mixed properly in the top two-thirds of the bucket.

Caren spread the grout. I wiped the stone clean. We seemed to have a system down until the grout in the bucket started setting up. Caren was having a hard time getting it to flow into the spaces between the stones. A quick re-read of the instructions and we realized we missed the whole part about only mixing what could be used in fifteen or twenty minutes... ugh. That is when we got lucky. Remember the dry stuff at the bottom of the bucket that wouldn't mix? We could add more water without getting the mixture off and soften up the rapidly setting grout in the bucket. Dumb luck, blind luck, providence... whatever you want to call it, it worked, and we were soon happily grouting away. Except that our knees and backs weren't so happy.

Every thing went smoothly until we had about two square feet of stone left to grout. That is when we ran out of grout... and that is where we left things before cleaning up and calling it a weekend. Which means we will be grouting again next weekend. Not such a big deal though because we have to recreate the whole process for the stonework on the hearth... after another trip to the tile guy to get more pieces to replace the cracked stones along with some more grout.

After grouting ninety percent of the stonework... If you look closely at the lower right hand corner, you can just see where we ran out of grout. The stones should come out a little shinier after we clean and seal them.

Leave it to us to pick the hardest "tile" to put in for our first "tiling" job. I have a feeling it will go much smoother the second time around...

Tuesday, August 30, 2011

Materials

Caren has been scouring Craigslist for finishing materials for the interior and siding for the exterior... She's been doing a pretty good job.

First load of barnwood... We drove up to Corning, CA on a Monday evening to pick thru the remnants of a 100 year old barn that a craigslister had torn down. We were hoping to get enough material to complete all the baseboard and door and window casing in the house but were disappointed. The barn had been on the ground for over a year and the wet winter and spring had done its work on most of the siding. Not to be deterred, we battled wasps and 95 degree temps to pull out the barn doors that were made of 1x12 fir. Also a few nice pieces of 2x6 and 4x4 rough cut. The 1x12 will become shelving in the kitchen. The 4x4 and 2x6 pieces will frame the stonework that is going behind the kitchen stove. However, the real gem was a 3x12 beam that will become the mantle piece over the fireplace. $100 for the lot... The beam itself is worth more than that!

Second load of barnwood... This stuff came from a 100 plus year old barn in Colusa County. Caren found an add for 600 linear feet of 1x6 redwood siding. Turned out to be about 540 linear feet, but it is in good condition, albeit with a few nails that will need pulling. We took a sample home, sanded and stained it... perfect!

This is Jesse... he took the barn down in Colusa. Stacked in his garage are 8x8, and 8x6 center cut redwood beams, 2x6 rafters, and 2x12 slabs. Stored off site are 40 foot long sill beams among other incredible pieces of wood. Along with the redwood siding that will become our baseboard and casing, we picked up a 17 foot 4x6 beam and two shorter pieces that will become the framing for the stonework on the fireplace. We also bought 55 board feet of 2x6 rough cut that will become the counter top and island top in the kitchen. All told over 350 board feet of hundred plus year old fir and redwood.

Jesse is standing in front of a dolly loaded with twenty-nine pieces of 2'x7' 24 gauge corrugated tin... Just enough to wainscot the lower three feet of the entire house... a style known as mining town chic. The world being as small as it is, he picked up those from the same craigslister that we got the first load of barnwood from. They had been on a newer barn on the same property that our first load came from.

The following pics are taken in the backyard in Davis. It has become the storage lot.

The short stack. Caren and Kelby salvaged the wine barrel from the landfill when they were getting rid of the drywall and insulation the kids tore out of the kitchen. We'll find some use for it.

The long stack. Behind it you can just make out the stack of ledge stone that will become the fireplace... Caren found that on Craigslist too. We picked up the slate flagstone that will be the entry and hearth flooring from the same guy.

And the corrugated metal... it is staying on the trailer until we can haul it up to Tahoe.

Now I need to get it all planed, sanded, stained and out of the weather. Lotsa busy evenings coming up...

Monday, August 29, 2011

A Subterranean Tour and Some Construction Amidst the Destruction

The inspector's report had me a little worried about the crawl space underneath the house: Twelve or so rotting stumps, loose wiring, falling insulation, construction debris and cracks in the foundation... nothing a little sweat and crawling around in the dirt couldn't fix, but I wanted a first hand look.

Three weeks ago I spent a little time on my belly in the dust and debris...

The insulation that the bear pulled down to make his winter bed should be easy enough to fix. Will probably conscript Kelby for help with that one because Caren hates tight places. And, this place is tight... in some spots it is a full belly crawl with virtually zero clearance above.

The wiring will be pulled out and replaced. Some of it is ghosted, that is old wire that is still in place but not connected to the electrical panel, some of it is still hot but not connected to an outlet or switch, most of it was left from Rick's remodel... hundreds of feet of cable TV, phone, sound, and DSL cable. I pulled out ninety percent of that on my initial subterranean tour.

I had visions of cutting out stumps while laying on my belly amidst carpenter ants and termites. Fortunately they were not prophetic. Of the twelve stumps, ten of them were so rotted at the roots that I was able to work them out by hand and roll them to the crawl space entrance. The two that are still in place are cedar... pests don't like cedar, cedar doesn't rot. I'll leave them for a future project. Someday when I'm bored! The best news is that none of the stumps contained any insects!!!

The debris will be easy enough to clean up. It'll just be a pain to push it all towards the entrance. Maybe I can rig up some sort of bucket system that will allow Caren to pull loaded buckets out so I don't have to repeatedly crawl back and forth.

The cracks in the foundation will be a bigger job, but I've got the solution worked out. I picked up a five foot piece of channel iron from the local fabricator and am having twelve half inch holes drilled into it as I type. The channel will be bolted to the inside foundation with 3/8 inch studs, thereby shoring up the section that has cracked... same place where the original plumbing installation breached the foundation for the DWV (that is trade-speak for drain, waste, vent... it's amazing what one can learn by researching stuff) system. All the work will be done in an area with less than two feet of clearance, so I don't relish the thought of it. Fortunately I was able to borrow a super cool hammer drill from the local remodel experts, Joan and David, that I'm told will go thru concrete like butter. That, I am looking forward to!

Interestingly, the pony wall above the cracking foundation and DWV breach was missing several cripple studs (sorry, the lingo is so cool... gotta drop it when I can). Maybe the original framers left them out on purpose to alleviate pressure on that section of the foundation. More than likely, somebody knocked them out at some point to access the crawl space. Whatever the reason, the long and short of it is that the framing was sagging above the void. Hence the sagging roof line I pointed out in one of the pictures in my original post. Two weeks ago I opened up the siding to access the pony wall, jack up the house and place new cripples. Finally some construction instead of destruction.

Besides owning a really cool hammer drill, Joan and David own a two ton house jack, which is much stronger than the car jack that I would have been using had they not had one. The jack made short work of lifting the wall despite the creaking and cracking protests that the house emitted...

Checking for level after one of several jack points and auditioning for a job as a plumber's helper...

Caren stood inside and and watched for any major shifting in the floors or walls, while I cringed with each turn of the jack screw... hoping that either the jack or the blocking would not explode in my face. Nothing blew up or shifted and after several jack points I had four new cripples inserted, a more or less straight roof line, and a more or less level floor.

This pic probably could have been left out of the post, but I think it is kind of ironic that I am fixing a problem that may have been caused by the DWV system while sitting on the main clean-out for the DWV system... yes, boys and girls, that pipe is where all of your poop goes...

Job done, complete with temporary critter guard installed. The plywood will remain until we re-side the house, Hopefully next spring. At least it is on the back of the building and the neighbors don't see it. The exposed waste pipe will be buried to protect when we install the BMPs, but that is a project for another time.

Wednesday, August 24, 2011

Deconstruction, err, uh... Destruction


Two weekends worth of work...

The kitchen before... countertops out of level, unmatched finishes, unfinished backsplash... The range and the refrigerator are brand new, furnished by the bank. Both will be sold on Craig's List, as will the stainless steel sink and all the cabinets if I don't use them in the garage.

The kitchen after... The sheet rock all needs to be replaced as it is a mishmash of patches, cracks and taping.

Caren posing with her new kitchen door...
well, what will be her new kitchen door

Living room before...
there is a fireplace behind that wall somewhere!

Living room after... 3/8" particle board subflooring on 2x6 t&g decking.
still looking for the fireplace!

Found it!

Also found three of these guys along with a large gray squirrel that made their way down the
chimney only to find themselves trapped... poor little buggers

And we finally ended up with this...

Forgive the terribly blurry Iphone pic, but I had to include this shot. The 4'x4' tile entry was nearly the death of me. It took the better part of three hours to get up. Between it and the vinyl floor in the kitchen I was just about destroyed. Whoever laid the flooring in this little house knew what they were doing.

I'll post more deconstruction pics later, but for now I'll leave you with a few action shots...

Caren slaving away in the kitchen...

Mother bleepin' bleep, bleep... Hand me the
bleepin' crescent wrench!

The HazMat crew about to tackle the mouse urine
soaked insulation... Again, forgive the blurriness. The boys
were laughing so hard that I couldn't get them to hold still.

Tuesday, August 23, 2011

Beginnings

4 August 2011--Escrow closed after weeks of faxes, international texts, emails, offers and counter offers... a long and twisted story full of hurry-up-and-wait, frustration and angst.

507 Koru Ct, South Lake Tahoe, CA in its "original" condition

The property was bank-owned, which made it an interesting process to purchase. Along the way we met the neighbors, forest service employees, real estate agents, inspectors and loan officers; all of whom added bits and pieces to our understanding of story that this little house has to tell.

Built in 1961, the house was originally facing east. It was accessible only by dirt road during the summer and snow mobile during the winter. Eventually the road came, along with utilities. The rear of the house became the front, the front the rear.

In 1985 "Rick" purchased the house and made it his own... which means he installed close to 1,000 feet of cable TV wire, speaker wire, phone wire, DSL wire, two satellite dishes, and an aerial TV antenna. In the process he drilled numerous holes through the exterior walls, rearranged some plumbing and electrical, and sheet rocked over the existing fireplace to create a wall big enough to hold a very large plasma television. He also added a shed, a hot tub, a garage door opener, some decking and a lot of garbage. Despite all of Rick's "improvements" the home inspector, Bill, gave the building a clean bill of health with a long list of "to-do's."

Somewhere along the line Rick entered a drug induced downward spiral that ended in foreclosure. Along the way he wintered over in the house with a local girl, all the while throwing garbage out the windows into the yard... not just candy bar wrappers and beer cans... according to the neighbors it was everything that one would normally put in the trash. Snow covered most of it, but the spring thaw revealed enough garbage that the bank had to bring in a front end loader and a 20 yard dumpster to get rid of the trash when it took possession. In the meantime, Rick, in trouble with the law, went on the lamb. Finding the trash on the outside of the house appealing, the local bear decided that what was inside might even be better. He created a door out of the window and made himself at home--helping himself to the contents of the refrigerator but not remembering to use the toilet when the need arose.

Eventually, the bank got the bear out and the place cleaned up with new carpet and paint. That is about the time that Caren and I first saw it...


The front yard viewed from the street... garage on the right,
shed on the left. Sorry about the finger in the frame.


The rear... you can see where the original "front door" was sided
over just to the left of the kitchen window. Note the open access
to the crawl space. This is where the bear slept when he wasn't in
house. Also note the slightly sagging roof line above the
kitchen window. More on this later...

The south wall as viewed from the "hot tub" deck...
check out all of the cable and wiring.

Two car garage with garage door opener but
without electricity... oh, and minus a key to unlock it. I
busted out my burglar skills and broke into the rear
door by removing the trim to access the jam, from where
I could jimmy the lock.

The rear of the garage and the "hot tub" deck complete with the
foreclosure notice stapled to the wall. The conduit on the wall
originally housed the wiring for the garage, but Rick used it to
power his hot tub... the one that he removed before the bank
kicked him out.

816 square feet of potential? Together, Caren and I have come up with a vision... lotsa work!