Sunday, October 21, 2012

Just in the Nick of Time...


Seems like I always find a way to put things off til the last minute.

Way back in June, Kelby and I crawled under the house and started hanging the new insulation to replace what the bear had torn down. We spent about four hours crawling around on belly and back, bathed in dust and fiberglass. We got about a third of the way finished. Three weeks ago, I talked Kelby, Alex and Zach into helping me finish the job. We spent about four hours crawling around on belly and back, bathed in dust and fiberglass. We finished the second third of the job. Two weeks ago, despite my previous insistence that Caren would never crawl under the house, she and I spent about four hours crawling around on belly and back, bathed in dust and fiberglass. We finished the final third...


Caren didn't relish the thought of bathing in dust and fiberglass, so she took appropriate precautions...


While the boys and I were crawling around under the house, Caren was working madly to finish the chinking before the snow flies. Most everything was done except for the tiny seams on the ends of the Pioneer Log Siding. She was able to finish most of it two weeks ago. What she didn't finish, we finished earlier today... while battling wind and intermittent snow flurries. Talk about putting things off til the last minute.

Despite my procrastination, the house is finally all buttoned up for winter. I had planned to finish everything last summer, but, well, I'm pretty good at putting things off...

Oh, and before I forget... I think I might have mentioned earlier that we chose to use cold rolled steel for our ridge caps. The thought being that it would rust, and, well, it would look rustic. It went on nice and shiny.


But, over the past two weeks, with the change in the weather, it is beginning to rust...


And it looks cool!

Tuesday, September 25, 2012

Nickels and Dimes

The other day I totaled up all of the receipts from a summers worth of work... big receipts... siding, roofing, chinking... and little receipts... screws, nails, drip edge. You don't even want to know the total, and those are not the nickels and dimes that I want to talk about.

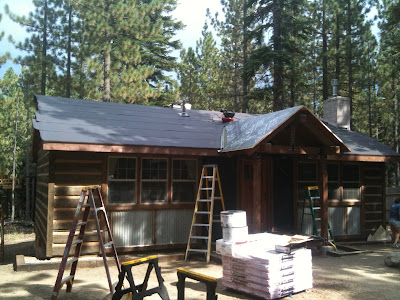
We are pretty much finished with the exterior, except for the chimney. The old siding is all off, the shear was installed, the new siding installed, windows and doors installed, new porch built, old roofing torn off, new roof decking installed, new crickets built, new roofing installed, soffit completed, shingles on the gable ends done, attic vented (wow, we did a lot this summer).

What is left are the little nickel and dime tasks. We need to hang new porch lights, chink and or caulk around the doors and a few windows, touch up a little stain, etc. That is what we've been working on the last few weekends.

Not many new pictures, because not much has changed in appearance, but I'm happy... happy because the big rush to finish is over. I no longer feel the need to work dawn to dusk and am more than happy for winter to come.

Wednesday, September 12, 2012

Up on the Roof

I almost titled this post, "The Never Ending Story" because it took forever to put a new roof on our little house... five weeks to be exact. Well, five weekends...


Step One: tear off the old cricket and build the new covered front porch.


Step Two: cover everything with tarps because it is raining. Call the inspector for a framing inspection on the new front porch.


Step Three: tear off all of the old roofing on the west side of the house, call the inspector to check the roof deck nailing, rent a roofing nailer, cover the roof with ice and water shield and/or 30# roofing paper.


Step Four: install shingles and corrugated metal on the west half of the roof. Cover the ridge with 30# roofing paper in case it rains because the ridge cap cannot be installed until the east half of the roof is done.


Step Five: tear off all of the shingles on the east side of the roof. Install new roof decking on the entire east side because the original decking was fifty years old and done for in many places. Call the inspector for a roof deck nailing inspection on the east slope.


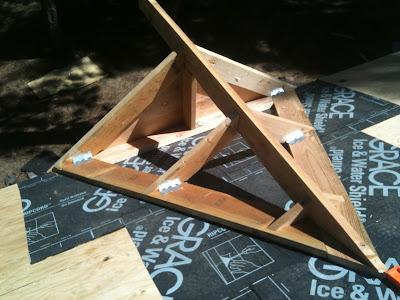
Step Six: Build two new crickets, one over the double doors in the bedroom and one over the kitchen door. Call the inspector for a framing inspection.


Step Seven: Rent roofing nailer.  Install ice and water shield and 30# roofing paper on the east slope and gables.


Step Eight: Instal shingles, corrugated metal and ridge caps. Return roofing nailer. Wait for the weather to rust the cold rolled steel ridge caps.


Don't forget the diverter over the plumbing vent that the inspector ordered.

My neighbor, after watching me finish up last Tuesday... yes I had t take a day off of work, asked me if I would do it all again. Upon reflection, I probably would... if I didn't have to coordinate inspections and nailer rentals and labor. The actual construction was relatively easy. The hard part was making sure that I would be around when the inspector arrived and that I could get the nailer rented and returned and that I had enough muscle to lift plywood sheeting and roofing materials onto the roof. Both inspector and rental shop keep bankers hours while I can only work on the house on the weekends and my muscle (read Kelby and Zach) aren't readily available every weekend.

Anyways... as of yesterday, its finally done and we are happy with the results.


oops... not done quite yet. still gotta shingle the gable ends of the crickets.


Monday, September 10, 2012

Visitors

Fall is coming... the critters are getting restless.

The jays, chipmunks and squirrels are busy fighting over pine nuts and whatever else they can scrounge from the yard. Squawking and squeaking, they are knocking sugar pine cones off tree limbs forty feet in the air. The cones come down like a bomb. If one were unfortunate enough to be standing in the path of one of the cones, death would not be out of the question.

But, the jays and chipmunks and squirrels are staying outdoors. The mice... not so much.

Three or four weeks ago I started hearing them in the bathroom. Then Caren started seeing them in the bathroom. Finally, the traps started catching them in the bathroom. I've become a pretty successful mouse hunter. If they kept a trapping average, I would be trapping at a 750 clip. That's right, 3 out of every 4 traps I have set have been successful.

I set three traps before we left for the valley three weeks ago. When we returned the following weekend two traps were successful. Both were in the bathroom. The bathroom smelled like animal. Caren sprayed air freshener. I figured that I'd caught the mice the night we left and they sat, ripening, for five days until we returned.

I was wrong...

I think I solved our mouse problem. Haven't heard them for awhile. But it wasn't the mice that I smelled. The other night, morning really, the dogs started going crazy at about 3 AM. Barking, scratching, running around the house. Bears are not uncommon in the yard... recall that one lived in our little house two winters ago... so I figured that one was walking through the yard. But the dogs wouldn't settle down.

Pretty soon, we began hearing a low growl from under the floorboards. I dragged myself out of bed and stomped on the floor once or twice. My stomping was returned with huffing... I stomped some more. The bear huffed some more. More stomping, more huffing and growling. The dogs continued to bark, but by this time they were focussed on the furnace register in the bathroom floor... and the bathroom smelled like animal... not dead mouse, more like live bear.

For some reason, don't ask me why, I bent down and pulled the register cover off of the duct work. Instantly the duct work was smashed by a very aggressive bear paw. I literally jumped back about three feet.

Now I had a very angry bear under the house and some smashed duct work. I no longer had barking dogs. The surprise attack sent them both scrambling for whatever cover they could find, Pico onto the bed with Caren, Theo into his kennel.

The dogs were quiet, the bear was huffing-his snout right up next to the duct, the cobwebs moving in and out with his breath. Caren was freaking out in the bedroom. And I was at a complete loss for what to do.

Apparently bears do not like the sound of metal on metal because when I rattled the register cover in the duct he took off lickety-split.

The next morning, I boarded up the entrance to the crawl space and, upon the advice of neighbor Tom, peed all over the ground in front of it... sort of marking my territory, saying that this den is already taken.

The bear has not been back... neither have the mice. But I should wear a hard hat when I'm outside because the squirrels and chipmunks are going crazy with the pine cones.


Thursday, August 23, 2012

Porch Pictures

I guess that the front porch has been the biggest piece of the Tahoe Project to date. Very labor intensive. Lots of inspections. Lots of $$$.


It started simple enough, just a couple of holes in the ground... eighteen inches deep, eighteen inches square, centered exactly six feet from the house and seven feet apart, racked for square, reinforced with rebar. Then the inspector would look at my holes in the ground. Who'da thunk that one needed to have holes inspected.


Kelby and Caren helped with the pour... a continuous pour, footing and pier at the same time. Six fifty pound bags of ready mix per hole and a about thirty pounds of cement mixed in for strength.


Of course, when one pours concrete, on must personalize it in someway.


Post are set... being extra careful to make sure that they are perfectly plum. We distressed all of the timbers before hand using a chisel and a sawsall. I have complete and utter respect for the the work that Richard does at Pioneer Log Siding. Distressing just the lumber for the front porch was a lot of work. I can't imagine how much time Richard spent on all the siding for our house.


 After the posts, the beams and deck joists... we also pre-stained all the lumber. The deck supports are tied to a ledger that is bolted to the house framing... not such an easy task considering that one must crawl into the coffin corner under the house to tighten the bolts. The beams slipped into beam pockets we created in the house framing as well.


After all the beams were hung, we played around with roof pitches. 12 in 12? 8 in 12? We final settled on 10 in 12.


Rafters, and ridge beam, California framing on the original roof deck. Cutting bird's mouths in 4" by 8" rafters and creating a tight joint is not an easy task. I struggled with it. Working very carefully, it took me two days to put up all the rafters. The joints aren't perfect, but they are close enough.


Then it started to rain... nary a drop all summer long, but as soon as we get the roof opened up, a weeks worth of afternoon thunder showers appears in the weather forecast. Caren complained about spending a hundred dollars on tarps, but when I explained that the alternative was spending several thousand dollars on new drywall and insulation, she reconsidered...


2x6 T&G roof decking... as well as the first of the shingles removed from the original roof.


and finally the corrugated metal on the gable to match the wainscoting under the windows. We used ice and water tape to cover the entire valley where the two roof planes tie together and 24 inch valley flashing. I don't think we will have any leaks. Keep your fingers crossed.


Finish up the siding around the front door... and with a few tens of hours of labor, we go from...


This...


To this... making us very happy campers!

Monday, August 20, 2012

In Between the Lines

Back when they used to make cabins out of logs, they would fill the gaps between the logs with a mud and straw mixture called chinking... They might still do that in some parts of the world, but not in Tahoe.

All of the gaps between our Pioneer Log Siding needed to be filled, just as if it the cabin was built with actual logs. We didn't use mud and straw. We used Permachink. Permachink, according to all that I read and was told, is vastly superior to mud and straw. It is applied with a caulking gun instead of by the fistful. It is weather tight and moves with the siding as it expands and contracts with the weather.


When one uses mud and straw to chink ones house, one doesn't need to calculate how much chinking to purchase. Given that a five gallon bucket of Permachink costs upwards of $250, I didn't want to overbuy, so I spent an evening calculating how much chinking we'd need for our little house.

After coming up with some way off base numbers, I finally resorted to the only thing I remember from high school chemistry... conversions. I should have taken a picture of my scratch work, but didn't. It looked something like this:

650 linear feet x 2 inches wide x 3/8 of an inch deep = 534 cubic units... but what units? Oh wait...

650 ft x 12 in/ft x 2 in x 3/8 in / 231in/gal / 5 gal/bucket = 5.06 buckets... follow that???

After checking and re-checking my work, I ordered five buckets of the stuff.


Permachink is applied over the plywood spacers that I mentioned in a previous post. It also is applied over foam backer rod. The foam fills large gaps and cracks. So, after filling all the gaps and cracks with foam, Caren and I set about chinking. And we chinked for days... I would apply the chinking using a Cox gun (basically a caulking gun on steroids) and Caren would smooth it using what amounts to a spatula.


I think that what we ended up with looks pretty authentic. As of today, we have finished chinking about eighty-five percent of the house. The remaining portions will involve scaffolding and ladders. Caren doesn't like scaffolding and ladders, so we have been putting off the last few courses of chinking.

Thursday, July 26, 2012

Its the Little Things

Siding the house is not all that time consuming... the amount of time that Ive spent actually putting up siding pales in comparison to the amount of time I've spent prepping to put up siding.

The other day Kelby and I replaced the freeze proof water faucet on the south gable end. It should have taken us maybe twenty minutes. It took us about four hours. We needed to extend the faucet about an inch and a half to accommodate the new siding. Freeze proof faucets come in varying lengths... ten inch, twelve inch, fourteen inch, etc. They also are threaded at the connection point and require no soldered joints to replace. In theory, all we had to do was take out the old one, replace it with one that was slightly longer and voila! I've learned over the past few months that theory and reality rarely match...


The faucet in question sits in what Kelby and I have affectionately nicknamed The Coffin Corner. It is the corner furthest from the crawl space entrance. There is barely enough clearance to lay on one's back without hitting the floor joists with ones forehead. There is not enough room to lay on one's side without hitting the floor joists. Fiberglass insulation hangs mere inches from one's face while one lays on one's back. Inches of powder-like dust that hasn't seen water in fifty years coats the ground. It is truly a hellish place. 

After crawling into the coffin corner to disconnect the old, too-short, faucet I realized that whoever installed it years ago completely rounded off the corners of the hexagon that the wrench grabs onto. Even with my largest set off channel locks I couldn't break the faucet lose from the death grip that the pipes had on it. Picture several trips back and forth, in the dust, on my belly to retrieve larger and larger tools. Picture hanging on a very large set of channel locks with all my body weight suspended off the ground. Picture much cussing and frustration. Picture me shouting to Kelby to bring the sawsall under the house...

Eventually we cut the pipe off, crawled out from the coffin corner, and headed to the hardware store to purchase a new, longer, freeze proof faucet and all the accouterments to repair the pipe we had cut.

Forty-five minutes later we were back under the house with a propane torch, solder, flux, a copper slip joint, and a new section of copper pipe. Remember, there is about eight inch of clearance in the coffin corner. Of course, the pipe that we cut with the sawsall was too rough to accept a new slip joint without leaking, so I planned to sweat it out at the nearest joint and replace it. There was nowhere close to enough clearance to spin a pipe cutter around it to clean up the end. Picture firing the torch up... picture the torch singeing the floor joist next to the pipe... picture lots of smoke in a confined area... picture a thirty foot belly crawl to get a foil pie plate to act as a heat shield. The heat shield protected the joist and saved me from burning down the house. Even so, it was difficult to hold the heat shield with one hand, heat the pipe with the torch in the other, apply solder with my third hand... oh wait, I don't have three hands. Maybe that is why the process was so difficult... that and the fact that I was trying to contort my body in such a way that I wouldn't have molten solder drip onto me despite the fact that I was working directly overhead in a space in which I couldn't even lay on my side.

An hour or so later I shouted to Kelby, who was right on the other side of the foundation the whole time offering words of encouragement and advice, that he could turn the water back on.

Ten seconds later I shouted to Kelby, who was still right on the other side of the foundation, that he better turn the water off because the new joint was leaking. I kinda figured that it would, given that I needed three hands but only had two.

Fifteen minutes later I shouted to Kelby, still right on the other side of the foundation, to turn the water on again.

Ten seconds later I shouted to Kelby to turn the water off... again.

The third time was the charm. I laid back on the ground, checked my watch and tried not breathe in too much dust or smoke while I waited for ten minutes to confirm that there were no leaks while the system was under pressure.

Then I made the thirty foot belly crawl to daylight... Yes, I still had a few minutes of daylight in which to put up siding now that I'd done the prep work.