Tuesday, September 27, 2011

Random thoughts on a Tuesday Night

My fifth graders have been working on art essays at school, so I thought I'd make one of my own...

Lest you think we are all work and no play... I did take a break from the project to take Kelby rock climbing. After all, he did earn it by helping with the wiring. This granite outcropping is a fifteen minute mountain bike ride from the house. Caren passes nearby frequently on her morning runs. She has been exploring the area quite a bit... running from Echo Lake to Glenn Alpine or up Mt Tam or deep into Desolation. Someday I will get out with her again...

...here is proof that it actually was me that took Kelby rock climbing. I am actually pretty stoked on all the possibilities that are essentially in our front yard. Caren can run a nine or ten mile loop, all on trail, right out the front door. Zach and kelby have taken their mountain bikes exploring and have come back excited about what the trails they have found... they call them steazy, whatever that means. Bouldering and rock climbing are within walking distance of the house. And come wintertime...

...this will be the view out the front door. For this reason, I am actually looking forward to the snow. Caren, Zach, Alex, and I have spent more than a few days on Angora Peak with our skis. Now, we will be able to make first tracks in the morning without ever getting into a car... and still have the afternoon to work on the house! So even tho I have been accused of being OCD about projects that I have started, you can see that I really am not all work and no play. But for now, while the banging in the house continues...

...the dogs have found what they consider the safest spot. When the nail gun is popping away and the air compressor is humming or the planer is grinding and the miter saw is buzzing Pico and
Theo retreat to their fortress in the bathroom. It is the one room we haven't touched yet... Soon boys, soon the forest will be coming to Dunsinane (a dollar to the first of you to identify that reference).

but someday, someday... Pico has already figured out what this whole project is about. When it is quiet he likes to enjoy the sun on his new front porch. Someday, someday Pico, we will all be doing the same thing... for now tho, next weekend will be once more into the breech, and that should be an hint that goes a long ways towards identifying the Dunsinane reference.

Monday, September 26, 2011

Buttoning Up...


Tom, the plumber, as opposed to Tom, the neighbor, was out at the house two weeks ago. We wanted him to look at a couple of things and give us a quote on installing a gas line to the fireplace, one that will supply fuel for the gas stove. After showing him around the place I asked him to reroute a vent from the sink. The original plumber routed it straight up the wall and thru the roof. I'm not sure why he didn't tie it into the main vent stack, but I didn't like the extra breech in the roof... one more spot to potentially leak. Figured that it was a good time to make the change since the walls were open. Tom said it was an easy job...

But, we had to schedule the job to be completed before Caren and I could insulate and panel the walls. Tom squeezed it in last Friday. On Saturday we were paneling the wall...

This is what we started out Saturday morning with... The black PVC piping is the rerouted vent from the sink. It used to go straight up thru the roof just to the left of the kitchen window. It is now tied into the main vent stack so that, once we redo the roof next spring, we will only have on vent breech instead of two. Notice all the nail guards over the wiring and plumbing? More on that in a bit...

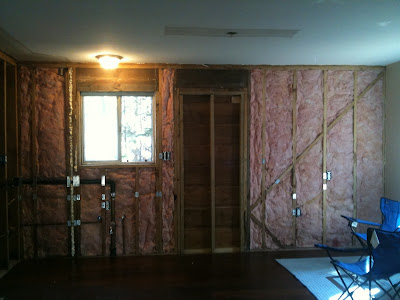
All insulated, except for where the door will be. The door should arrive next Saturday. Once it is in place the wall will be completely sealed... finally. It is amazing what just this little bit of insulation did to keep the place warmer on Saturday evening. Who'da thunk a bunch of pink fiberglass could do such a good job? Wish we could have fit more into the walls, but 2x4 framing will only allow for R13 rated fiberglass. Spray foam or rigid insulation would have given us a higher R value, but would not have been cost effective given that the rest of the walls aren't insulated with any higher value stuff.

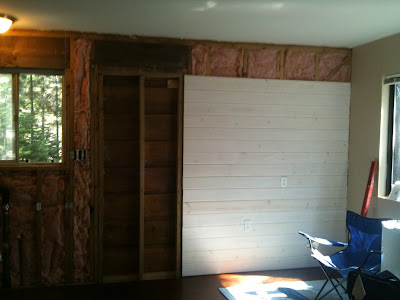
Part way into the paneling job... Caren and I both like the look of whitewashed pine paneling for the country kitchen/cabin feel. We ordered 1x6 tongue and groove from California Hardwood Producers, the same place that provided the flooring. Caren and Kelby spent a few hours white washing it two weeks ago. They mixed flat white ceiling paint with water in a 1:7 ratio to thin the paint down and applied a single coat. The result is an aged look that allows the grain of the wood to show thru. Basically, the boards look like they were painted years ago and have seen a little weather.

One of my little joys while doing the install was placing the outlet covers... something about a finishing touch even tho we are nowhere near finished. But, the outlet cutouts cause me problems to no end. I use present tense because I'm sure that they still cause me problems and will continue to do so in the future. For some reason I just can't seem to get the cuts right when making them, whether in drywall or paneling. I'm always off one way or another by just enough so that the cover won't quite hide my cut. The first outlet I came to took three boards and quite a little bit of cussing before I got it right (fortunately I could cut out the mistake and save the boards for later use). After the first one was done I developed a system that worked for all the rest of the outlets until the last one... one for which Caren had a good laugh at my expense.

Paneling job complete with enough time to install the frame work for the 1921 Detroit Jewel gas range that will go in the kitchen.

The posts, beam, and mantel work is very similar to that for the fireplace with a few exceptions... First, the posts and beam are from the wood salvaged from the Corning barn. Second, the mantle (really just a shelf) is from our neighbor's back yard, the remants of some mill work he completed for a client. It was cut using a chainsaw mill so has some really rough saw marks that Caren and I decided to leave in. Third, the wood definitely took the stain different than the fireplace mantel. It is more of a golden brown than the red brown of the mantel. Caren is not entirely happy with it, so we may be applying a red stain to it in an attempt to better match the fireplace.

The plywood up the center of the wall was designed to be a cost savings. Turns out it wasn't... Between the posts described above will be ledge stone and corrugated metal. No need to place the more expensive pine paneling if it is just going to be covered, right? We cut the paneling to fit the plywood, installed it, and made a quick trip to the DIY store... it really is called DIY... to pick up the plywood. They didn't have any full sheets of 3/4 inch, only half sheets. A full sheet of CDX grade 3/4 inch ply should run around $20. The half sheets that they had were $22 each. If I'm doing the math correctly, that is $24 just to cut a 4x8 sheet into two 4x4 sheets. I balked... but, Meeks, the local lumber yard, is closed on Sundays, and I fell into the just git'r done trap that I struggle with and ended up paying $44 for two half sheets. The pine paneling would have been about $52 to cover the same area. Big Savings!

Remember those nail guards in the first pic? I hit one with a screw while installing the plywood and nearly ruined Tom's work on the DWV system... fortunately the guard did its job and protected the pipe. Whew!

We also installed new valves on the sink supply lines. The cold water supply valve had a fitting for the water line to a refrigerator. We didn't need it, and couldn't turn the water on without somehow closing that line off, so... and of course, the hot water valve has to match the cold water valve. Valves are inexpensive.

Stove framework installed... We had Tom, the plumber, move the heat vent on the floor to its current position. Previously, it had been in the middle of the kitchen floor... don't ask me why. It would have been an easy job for me but involved crawling around under the house. Tom was going to be down there anyway so I thought I'd let him do the work...

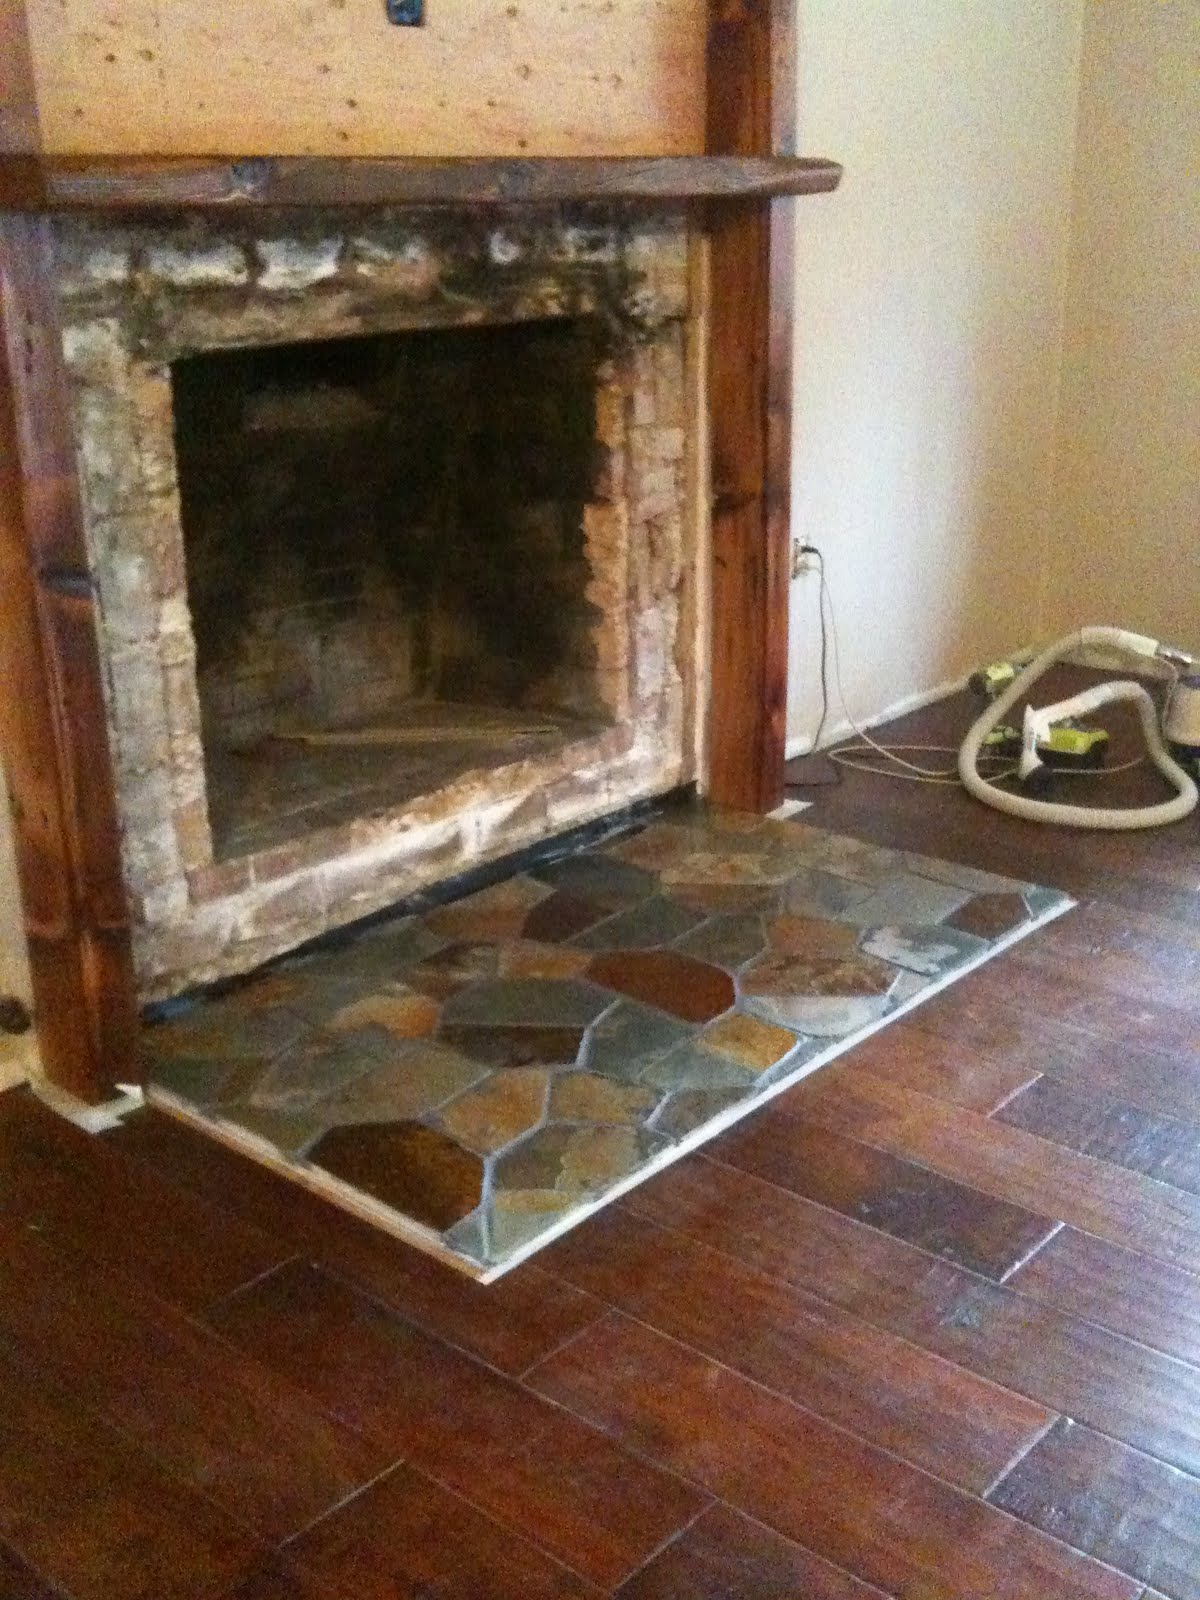
Included this pic because, if one looks carefully, one can see the gas stub coming thru the wall just to the left of the left hand post. That's the one that we asked Tom to install before I got him sidetracked with DWV talk. Anyways, he finished the gas line too. The real reason that I included this pic though is because Caren sealed the stonework on the fireplace hearth before we left on Sunday. How cool does the finished product look?

So, we got the wall buttoned up in time for the snow... as long as we get the door installed in the next two or three weeks, but we still have to repair the bear damaged insulation under the house. Now, I'm learning what it means to be a general contractor, what with scheduling labor and all... Can't do the insulation next weekend because we have the floor nailer rented from the flooring place and need to finish the flooring in the bedrooms while we have it (yes, the rest of the flooring was delivered last week). Can't do the insulation the following week because Kelby won't be around to help with the install, and Caren isn't about to crawl under the house with me. Maybe, just maybe, I can get Alex or Zach to help...

Tuesday, September 20, 2011

Cold

Tom, the neighbor, says that summer is over when the needles start to fall from the pine trees... as of last weekend, the needles are falling. And it is definitely getting colder in Tahoe.

Caren and I are spending our weekend nights sleeping on a full size inflatable mattress. It is comfortable enough, but doesn't insulate real well given that it is laying on top of a floor that is uninsulated thanks to the bear that pulled the insulation down in the crawl space. I'm sure that he made himself quite a cozy little bed, but he definitely made our bed a little less cozy. Those cold mornings in bed make me a little uncomfortable. Uncomfortable in the sense that I feel time ticking away. We are running out of weekends to get the house buttoned up before the snow starts to fall.
All the comforts of home? This is what amounts to our bedroom furniture. We are holding off on putting anything permanent in until we get the painting and flooring finished.

The plumber is supposed to be in the house this week to fix several odds and ends in the wet wall between the kitchen and bath. We are hoping that he gets all the work completed so that we can insulate and put up the pine paneling in the kitchen this coming weekend. That, should we get it accomplished, will go a long way towards buttoning the house up. At least then we will be able to run the furnace without feeling like we are attempting to heat the entire Tahoe Basin.

Next on the to-do list will be insulation in the crawl space. That's a job I am not looking forward to, but with a little luck I will be able to wrangle Kelby into sharing it with me.

Speaking of cold... as of last Friday evening, Caren and I are the proud owners of five... yes five, refrigerators. There are two at the house in Davis. I say at because only one is in the house. The other one is on the back porch--a little project that Caren started a few months ago, but has yet to finish. There are two in the Tahoe house. One is brand new, furnished by the bank after it took ownership of the place. The other we just purchased as a temporary measure. And the fifth refer is in pieces, some of it in the back yard in Davis, some of it at All American Powder Coating being refinished--a little project I started and have yet to finish.

The refrigerator that the bank put in is great, but it is too large and too modern to fit into our kitchen plans. I've moved it from one side of the room to the other several times depending on where I am currently working. I finally decided that I've moved it too many times. It needs to go, so we put an ad on Craigslist. In its stead we purchased a used dorm style fridge off of Craigslist. It is much smaller and much easier to move around. We'll keep it until I finish restoring the 1930's GE Monitor Top refrigerator that will be a permanent fixture in our kitchen. More on that little project in a later post...

The extent of our kitchen furnishings... Our newest little fridge suits our needs much better than the big one the bank left us. Caren thinks we paid too much for it, but $40 bucks seems like a steal as long as I don't have to push, pull, and pry the full size one around anymore!

Sunday, September 18, 2011

A Work in Progress

... well, most of the house is a work in progress. But, this time I'm talking about the fireplace. If you've read some of the earlier posts, you'll remember the hidden fireplace... the one that Rick buried in sheet rock to make a wall big enough to handle his plasma television, the one that housed several dead squirrels, the one that looked a little shabby after we finally found it.

You might even recognize some of the following pics:

As we first viewed the "fireplace" back in July...

After we found the hearth... knew it was there because I could see it in the crawl space, just had to remove the carpet and subflooring.

and upon further inspection, we found this...

and this...

after cleaning our discovery up, we had this...

This pic was taken about six weeks after the first pic. Like I said, a work in progress... Preparing to place our own version of a hearth. These stones went down much easier compared to our first attempt, the one that I blogged about earlier.

Assembling the posts, beam and mantel... The posts and beam are from the hundred year old barn in Colussa County that Jesse tore down. The mantel is from the hundred year old barn in Corning that Jennifer tore down. I love the character each piece has, but it was very labor intensive to get that character to show. Working with reclaimed wood is not like working with the stuff one can pick up at Home Depot. As wood ages it hardens, twists, bows, and checks... that's fancy talk for the splits and cracks that form as the wood dries out. The posts and beam were straight enough that I could run them thru the planer, but it took seven or eight passes on each face. The mantel was twisted so badly that it had to be hand sanded with both belt and disk sander as well as hand planed using a seven inch block plane. It also had some dry rot at one end that had to be sanded out, but that was rather fortuitous because it allowed me to take liberty with shaping the piece to lessen the twisting. After several hours of rough sanding I had a piece that more closely resembled a slab from mill run than a rough cut 3x12. All four pieces were then finish sanded with first 120 then 220 grit sandpaper. Finally a coat of Watco Oil in a natural finish was applied. Given that the mantel was a different species of wood, fir versus redwood, than the beams I was a little worried that it would take the stain differently. Sure enough, it did. So, the mantel also received a coat of Dark Walnut oil to better match the posts. In the end, the mantel had more of a brown tone while the posts and beam had more of a red tone, but given that the slate and ledge stone we are using in the fireplace vary in color I didn't fret too much.

Hardness and twisting posed additional problems during assembly. The first being the pre-drilling of holes for three-eighth inch lag screws. The wood was so hard that my sharpest 3/8" bit would barely bore thru it. I finally ended up using a 3/8" paddle bit to get the job done... but it took two full batteries for my cordless drill to get the eight holes drilled. If you look closely at the pic, you will notice the black, square head, 3/8" lag screws. I dare you to try to find those at your local Home Depot or Lowes. Oh, they have them, but not in seven inch lengths... I almost bought the off the shelf 1/4" timber screws that Home Depot stocks, but wanted something with a little more heft purely for aesthetic purposes... After scouring the internet, I found The Blacksmith's Depot. They had the screws, albeit not cheap. Anyways, it was again fortuitous that I went with the 3/8" screws because the posts had enough of a twist to them that I had to use the screws to pull them into some semblance of straightness so as to achieve a tight fit with the mantel. As I cranked the screws tighter and listened to the wood protest as the twist straightened, I prayed silently that the head of each screw wouldn't twist off. I'm pretty sure that at least one of the 1/4" lags from Home Depot would have snapped. And that would have been a nightmare to rectify. I don't even want to think about it. After all was said and done, I was very pleased with the results.

Notice the lack of paint on the walls surrounding the fireplace??? That is the result of a lot of scraping to remove up to a 1/4 inch of dry wall mud that was used to tie Ricks drywall job into the then existing drywall. Interesting craftsmanship to say the least. Anyhow, in the above pic one can see a fireplace mantel, the stone hearth, and the existing wall all prepped for installation. There are at least 32 man hours of labor to get to that point... like I said, a work in progress...

Unassembled, moving each piece of the mantel is a one man job... although Caren didn't like the task very much. Assembled, the entire piece is, well, quite heavy. I thought it would have to remain on the floor until I could coax Alex and Zach up to the house under the pretense of a mountain bike trip or something, but our very helpful neighbor, Tom, volunteered to help me step the assembly up into place. Tom, is a contractor and has been doing what I play at his whole life. He makes the hard stuff I do look easy. He made stepping up the mantel assembly easy. We just slid it right into place. I hate asking him for help because it'd be like asking my massage therapist girlfriend for a massage. Just doesn't happen. I'm sure Tom doesn't want to come home from a long day of building sh@t only to have his novice neighbor ask him to help build some sh@t... Anyways, Tom is a great guy and always gives sage advice!

All tied into the wall using more of the black lag screws... which meant more drilling, but less praying because I didn't have to coax anything into place. Caren and I both are digging how the floor, the slate and the beams all compliment each other. There is a piece of the ledge stone on the mantel that will eventually cover the firebox and surround the television box that will sit on the mantel. Oh, the electrical outlet centered above the mantel required more fishing for wires in the wall and climbing around in the attic. This time the fishing was relatively easy, but I smacked my head on a collar tie in the attic hard enough to draw blood. Gawd I hate electrical work.

Still quite a bit to be done on this work in progress, but I'm pleased with how it has turned out so far...

Monday, September 12, 2011

Flooring... A Lesson in Sales and Advertising

This was a big decision... as well it should have been given that it is probably going to be the single largest expense on interior renovations.

Caren scoured Craigslist incessantly for deals and found few leads. She did however find a mill in Auburn, California Hardwood Producers, that was running a special on hand scraped hickory engineered flooring, so we thought we'd stop by and check it out on our way up the hill one Friday afternoon.

The hickory was nice looking stuff, but it was obvious why they were running a special on it when we compared it to other flooring samples they had on hand. Of course the most stunning stuff was salvaged solid wood flooring from one hundred year old building or another... so was the price--upwards of $14.99/ft. We'd had a price point of $4 to $5 in mind so were a little shocked when we realized that we could pay upwards of $10,000 to floor our little house if we so wanted.

Anyways, after talking with Francisca, the sales woman, we learned that solid wood flooring might not be the best choice for our situation given the temperature fluctuation that our house would experience during the Tahoe winters. Going from 55 degrees during the week when we were not in residence to 72 degrees on the weekends when Caren wanted to keep her toes warm would cause drastic expansion and contraction of the wood. Needless to say, I was relieved when we turned our attention from the reclaimed solid wood flooring displays.

Next up were questions about the differences in prices for engineered flooring... Why was the hand scraped hickory from brand X $3.00/ft cheaper than the hand scraped walnut from brand Y? And what about that $.79/ft laminate from Home Depot?

Francisca was very patient with us and answered all of our questions. And we were left with new terms like wear layer, cross grain, machine scraping, etc, etc, ad infinitum bouncing around in our heads. We did leave that afternoon with a pretty good idea of what we wanted though.

And Caren scoured Craigslist for another week or two...

Ultimately, we ended up back at California hardwood Producers and ordered 500 square feet of a beautiful hand scraped walnut floor from Hallmark Hardwoods. 500 square feet would not be enough to floor the whole house, but it would be enough to finish the kitchen, living room, and hallway. Given that we chose to pay a little more per foot to get quality flooring... not $14.99 per foot by any stretch of the imagination, but not the $2.99 per foot that lured us into the place either... 500 feet was about all the budget could handle. The bedrooms will have to wait...

And, as Francisca was swiping my credit card I was thinking about lessons in loss leaders that my grandfather, perhaps one of the world's greatest salesmen, had taught me while we sat in a boat and waited for the fish to bite... Francisca had gotten us into the store with the $2.99 per foot Hickory, then let us ogle the really expensive stuff, then told us why we didn't need to spend that much money, then sold us on something less expensive than the top of the line, but more expensive than what she had used to get us into the store in the first place...

She would have made my grandfather proud!

In all fairness... California Hardwood Producers has been excellent to work with. They delivered our flooring to Tahoe, a two hour drive from Auburn, for gas money. They only charged us for a week's rental of the flooring nailer even though they knew we would have it for at least three weeks, and they off loaded their truck into our living room while stepping over freshly grouted tile without missing a beat. I can highly recommend them as Caren and I are more than happy with our purchase.

Enough babble... so, without further ado, some pics!

Delivered on a Wednesday by the great people at California Hardwood Producers. They were super careful about avoiding the partially grouted stonework at the front door. Stacked behind the flooring is paneling that will go in the kitchen, also delivered by California Hardwood Producers, and up on top of the flooring is the hated wiring that Kelby and I fussed with all last weekend and I blogged about in a previous post.

Unpackaged and stacked by length on a Friday evening, then left to acclimatize for eight days.

About two thirds of the way through the install last Saturday we realized that we would need a floor puller to install the last course that would run right up next to the wall. We made a quick trip to the hardware store in hopes that they might have one... but the guy had no clue what we were talking about. So, I thought I'd make due with a nail puller... think again... the first board I tried to pull into place got scratched, and I quickly nixed that idea. The final course will have to wait until I can get a proper floor puller.

What's left undone after a ten hour day. We still have about nine courses of flooring to set in the kitchen and the final course in the hallway. Should take a couple of hours next Saturday...

I'll leave you with a couple of observations I made before we left on Sunday morning:
  1. Hand scraped walnut is much louder than particleboard subflooring
  2. Dark wood shows every speck of dust under the right lighting conditions
  3. Dark flooring really subdues a room
  4. I am totally stoked on our floor choice!

Wednesday, September 7, 2011

Electricity

One of the projects that Kelby and I tackled during the three day weekend was the rewiring of the entire kitchen.

Once the kids had torn off the drywall and insulation in the kitchen, a hodgepodge of wiring was exposed. Some of it was original... 10 guage, 2 wire, no ground... some of it was 14 guage 2 wire with a ground. There were also junction boxes hidden behind the drywall--a definite no no according to Homes on Homes, not to mention code. It was an easy decision to make when deciding that it had to go.

We started by ripping out all of the old wiring and placing three new outlet boxes, a new switch box that would power the lighting over the sink and the one that will light our currently non-existent back deck, and a GFI (ground fault interrupt... again, the cool lingo) outlet that will power the garbage disposal--we don't have a disposal in the Davis house, and I have decided that it is a must have for the new place. GFIs are used wherever electricity and water can mix. Gotta thank Holmes on Homes for that tidbit.

That was the easy part... running the new wiring was a little more difficult. Picture Kelby in the attic with a twenty-five foot fishing tape... a cool tool designed to fish wire thru walls... and me standing outside trying to fish the end of the fish tape out of a 3/4 inch hole eight feet below him...

"Can you see it?"

"Nope, but I can feel it with my pinky finger. Up a tiny bit... down a bit... too much... up a bit."

"Can you grab it"

"Don't move, I'm getting the needle nose pliers and a coat hanger."

You get the picture. About forty-five minutes of that and we finally had two strands of 14 gauge wire and a strand of 12 gauge wire fished thru the wall and up into the attic. The 12 gauge would power the outlets, the 14 would run the lights.

After installing a junction box in the attic, we ran the 12 gauge wire thru existing holes drill in the framing and shortly had the outlets, including the GFI up and running. The lighting posed a more difficult task. 14 gauge had to be run down from the attic to the switch on an exterior wall, back up to the attic, over a door header, and back down to the light fixture for the back deck. Simple on paper, not so in reality.

See, the roof pitch is 3 on 12, meaning that for every horizontal foot of roofing there is a three inch vertical rise. What that means is that there is very, very little clearance above the exterior walls. Add in a few inches of fiberglass insulation and 16 inch stud bays and one has what amounts to very tight quarters to work in...

fiberglass insulation, stud bays and rafters left out for clarity, sound effects not included with picture because they would all need to be bleeped out anyways.

I wore long sleeves, long pants, a dust mask and safety glasses, but I am still itching from crawling around in the insulation. At one point my face was buried in the god awful stuff, eyes closed, minimal breathing, while blindly groping for the hole in the top plate to feed the wire through only to discover that I could not fit the down strand thru the same hole as the up strand. Kelby quickly grabbed the drill and bore a new hole from down below while I prayed that he wouldn't hit my hand... which I couldn't really move out of the way because of the tight confines. Kelby has good aim with an 18 volt cordless drill mounted with a 3/4 inch auger bit. I wonder what my hand would have looked like with a 3/4 inch hole in it...

Long story short, it took us all day... 7:30 AM til about 7:00 PM to complete most of the job. I say most of the job because we still have to wire two three-way switches to power the light that will go over the kitchen island, but that should be simple. There is ample clearance... about three and a half feet... in the attic above the where the island will sit.

Shhh, don't tell Holmes on Homes that we didn't pull any permits for the electrical work!

Tuesday, September 6, 2011

Tools are Cool

A friend shared her husband's theory on home repair the other day... it went something like this:

"You need me to install the $25 doggie door? I'll need to get the $140 saw to do that..."

Remember that barnwood siding that we bought a few weeks ago? The stuff that we are using for the trim work in the house? It all needs to be planed down to expose the deep red tone of the wood, so...

"You need me to plane the $1.50/ft baseboard and door casing? I'll need to get the $400 planer to do that..."

I stopped by the local Home Depot and picked this up today:
I had a chance to play around with it this evening and ran a piece of the Douglas Fir barnwood that we got in Corning thru it. After a couple of passes I had about the prettiest piece of wood I've seen... until I ran one of the Redwood beams thru it. I am so stoked. We are going to have the coolest fireplace!

"You need me to install the Pine paneling in the kitchen? I'll need that $269 air compressor and 16 gauge nailer to do that..."

I also picked up a Porter Cable air compressor and nailer.


I'll get to test it out next weekend when we install the hardwood flooring that was delivered to the house last Wednesday.

Judy, please tell Jim thanks for indirectly giving me permission to buy a couple of cool new toys!