Monday, June 25, 2012

Photo Dump

So, I have a problem... so much to blog about, but no internet connection at the house to do so.  School has been out for about two weeks, and I've spent most of my free time up at the house in South Lake. Lotsa goings on, but, like I said, no internet connection. I'm currently in Davis and have a free minute, but only a minute. So, I'm gonna dump some pics onto the blog and scribble off a few brief descriptions.


The shear and insulation for the siding project arrived a week ago last Monday. There wasn't any shear under the siding on the house, so this stuff has to go up before we re-side. At least the permit was easy to get...


The siding arrived a week ago last Wednesday. Unfortunately the eighteen wheeler couldn't deliver to the house. Instead, my dad and I had to off-load the siding by hand in the parking lot of an empty building; transfer it to a trailer that Caren's truck could pull; haul it all to the house; off-load it again... then return to the parking lot for a second trip to pick up the remainder that my mom had been patiently guarding. The siding is super cool... Quite possibly my favorite item that we've purchased for the project. More on that in a future post.


Finally got around to cleaning the bear damaged insulation out from under the house... We bought insulation to replace it a few months ago. It was on sale at the local hardware store for forty percent off. Now I just gotta find the time and the motivation to put it in the crawl space.


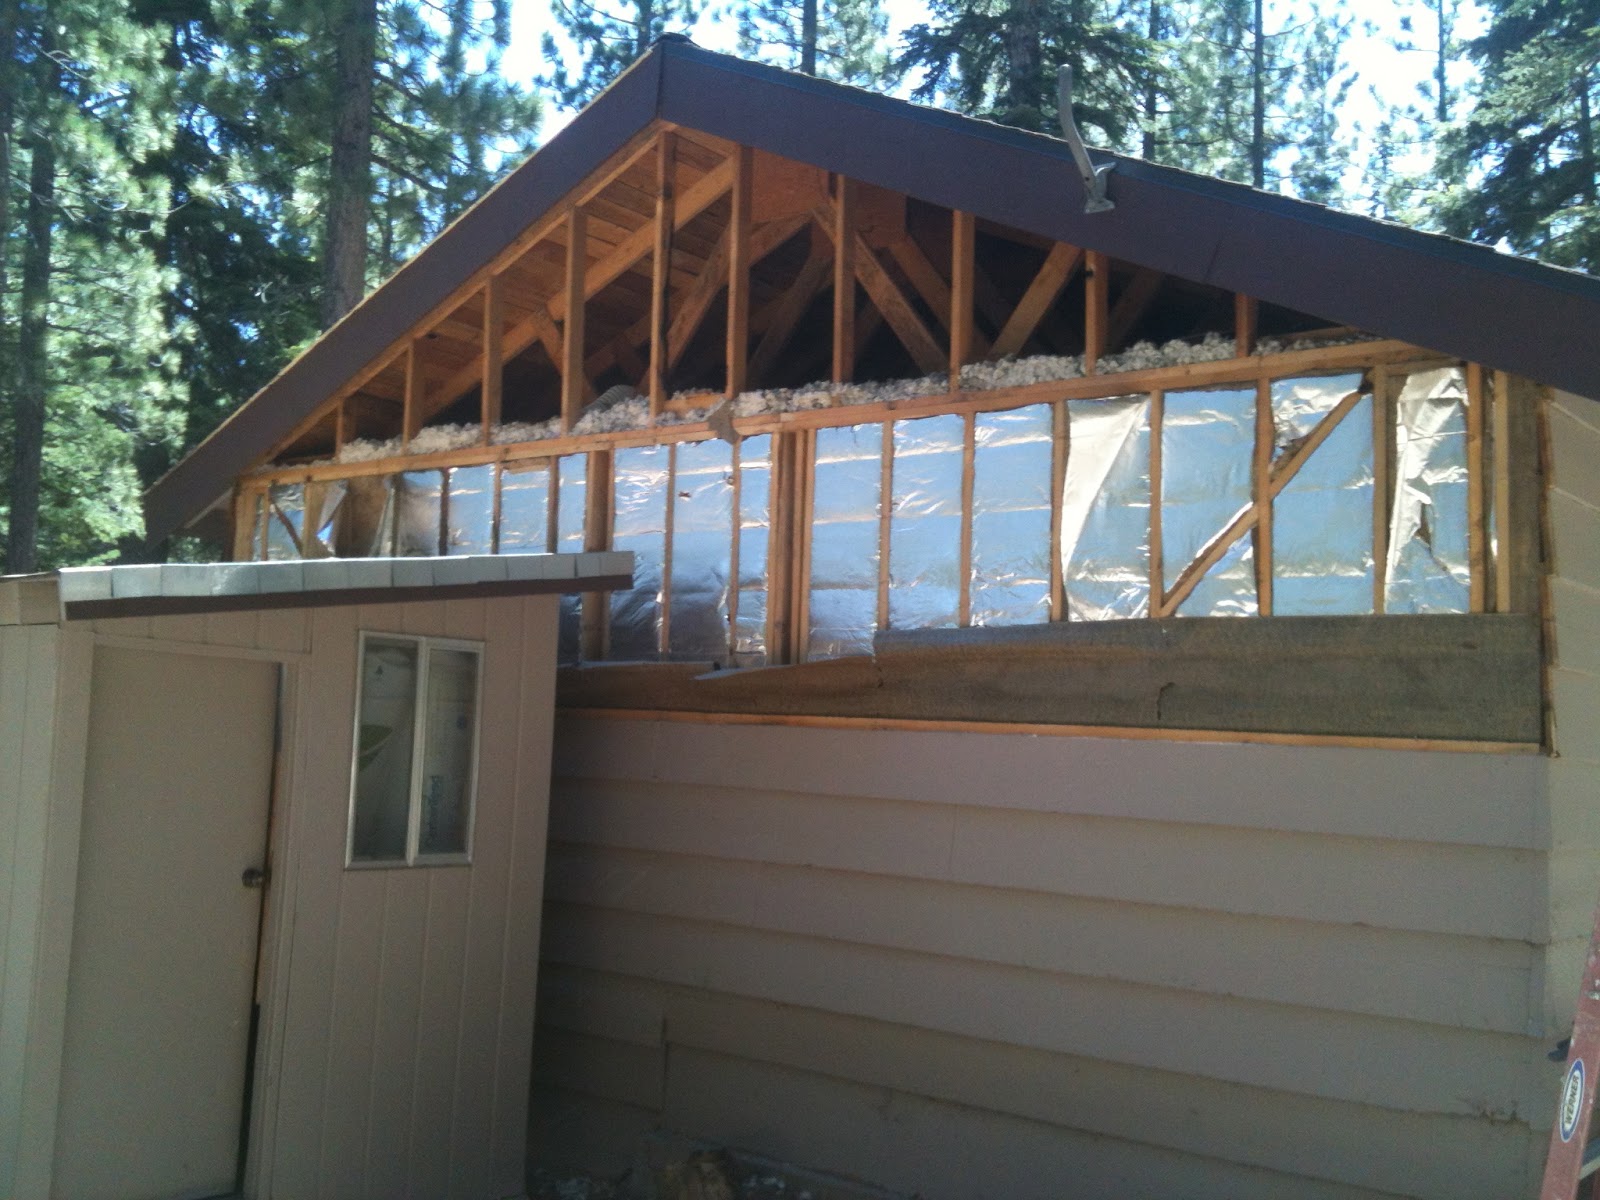
Started the re-siding project in earnest last Wednesday. The first step is tearing off the old. Then remove the old insulation. Then replace any damaged framing. Then replace the wiring. Then put in the new insulation...


... Then put up the shear--half inch thick 4x9 sheets of oriented strand board.


Gave the shed away for free to a couple of guys on Craigslist. According to the TRPA it wasn't legal coverage and it was easier to get rid of it then to go thru all the hassles and paperwork to make it legal. Anyways, the guys came with a sawsall and disassembled the shed then hauled it off to Markleyville in two trips. I think they were in a little over their heads, but they kept at it until the shed was gone and they had cleaned up any mess they made.


By Saturday last, Alex, Caren and I had shear installed on two of the four walls... We also replaced the windows in the living room and extra bedroom. This time, the windows were done right... no oh $h!t moment in the shower the next day.


Oh... we are more than half-way done with the sheathing because we also finished this half of the south wall.


But...  we still have this much to do... including replacing two windows and adding one set of French doors. Then, after the inspector comes to check our work, we can start putting up the actual siding.

Tuesday, May 29, 2012

And There Goes the Porch...

Last Friday night it snowed... maybe for one last time before summer sets in. Saturday morning Caren shoveled the front deck... definitely for one last time. By Sunday all of the snow had melted off, and summer had set in.

With the arrival of summer things are about to get busy. Siding has been ordered, the permitting process has begun. Big changes are afoot.


By midday Sunday the front porch looked like this. We had already removed nearly half of it before I remembered to snap a few photos. The porch had seen better days and was pretty much worn out. It didn't really fit into our plans. And, I had concerns about the construction. The ledger board (where the porch ties into the house) was attached to the siding instead of the framing. Somebody had tried to flash it to protect the siding from water damage, but mickey-moused the job. I had a sneaking suspicion that I'd find water damage when I removed the ledger board.


Sure enough I was right... and the carpenter ants liked the moisture to boot. Fortunately the damage is limited to the house rim on one corner. Neighbor Tom says it is an easy fix. And I sprayed the ants...


By Sunday evening all that was left of the porch was the piers. I fashioned a couple of steps out of paving stones that were laying around on the property when we bought the place.


Before we left for the Valley on Monday evening we'd removed all the piers and their accompanying footings. We also created a moveable temporary stoop out of the left over deck boards. When we get to siding the house, we will be able to move the stoop out of the way to complete the work, then replace it until the permits are issued that will allow us to build the front deck.

Tuesday, May 15, 2012

More Furniture...

Caren's mom and dad are coming to visit in a week or two. Mine are coming sometime in June. We needed some furniture... beds in particular... for the guest bedroom. We can get away with putting teenage and twenty something boys on blow-up beds, but somehow I don't think that moms and dads would appreciate air beds in quite the same way.

So, after scouring the internet for ideas, we set about making some furniture...


Home Depot supplied us with inexpensive lumber... 2 x 4s, 2 x 8s, 1 x 2s, 1 x 3s and a sheet of plywood. An hour or two of cutting and we were ready to sand and assemble. Sanding is very time consuming. When one purchases inexpensive dimensional lumber, one must sand a lot. Caren and I sanded for the better part of four hours.


The headboards and matching footboards went together quickly and easily.


We thought we'd try to match the finish on the interior doors; a combination of dark walnut and mahogany Watco oil. Caren spent several more hours applying the finish.


After a weekends worth of work, we had two beds. Neither Caren nor I were entirely satisfied with the finish.


Not the best of pics, but after another day of finishing, we were much happier with the new look. Caren still has stained cuticles, but she isn't as grumpy as she was when she was halfway through the second finishing.


We figured we needed a night stand to match, so I used scrap from the bed construction, as well as a few other odds and ends that were lying around, to create this matching piece. I'm kinda proud of it because it was entirely created from scrap, and, if you don't count the hardware, didn't cost a dime.


After an unsuccessful and frustrating shopping trip to Ikea, Walmart and Target, Amazon.com provided us with vintage quilts and matching bedding.


Caren did find the candle holder at Ikea, but the real story behind this pic involves a promise. Caren was so fed up with staining that I promised that I would stain the nightstand. I wasn't quick enough in honoring that promise, so Caren set about staining this piece too... and she was grumpy.


Grumpiness and shopping frustration aside, everything came together nicely. Hope the moms and dads like the results, even if they have to sleep in separate beds. We considered a full or a queen, but decided on twins because teenage and twenty something boys refuse to share a bed... even if it is a queen.  That, and the bedroom is pretty small.

Thursday, May 10, 2012

Fans

April 26, 07:30 pm

Caren finds ceiling fans on sale in Costco. Because the fan in the house is old, tired, and most of all, ugly,  we plunk down a few bills for one.

April 28 11:30 am

Caren suggests we install the fan. I cringe because fans should be easy, but I know that they are not.
Soon we have a new location on the ceiling picked out... one that is more centered in the room... Caren is standing on a stool with a drill. I am sitting in fiber glass insulation in the attic trying to locate the hole she has drilled.

11:45 am

The hole has been located. The tired, old fan has been removed. I am in the attic again with a keyhole saw, a crescent wrench, and a power drill. Soon I have the fan box relocated and am ready to start hanging the new fan. Caren is complaining of a headache.

12:00 pm

I remember that ceiling fans need electricity. Fortunately I have previously installed three-way switches to power the fan from opposite sides of the room. All I need to do is run one wire from the last switch on the three way circuit to the fan. Caren has a headache.

12:30 pm

The power is off at the fuse box. I am in the attic with wire cutters, wire nuts, pliers, and electrical tape. I am swimming in insulation. Caren is in the room below me with the wire fishing tool. We are having no luck running new wire from the switch thru the wall to the attic. I am beginning to get frustrated. Caren appears pale.

1:30 pm

We are both standing on the front deck pulling siding off the house to open up the wall and run the new wire. I am cussing. Caren is cringing.

2:00 pm

I am standing on the front porch putting siding back on the house after running new wire. Caren is falling asleep on the couch.

3:00 pm

I am in the attic connecting new wires. Caren is asleep on the couch.

4:00 pm

The wiring is connected, and I am testing the three-way circuit. The fan works great. The porch light does not. I am cussing again. Caren is still sleeping on the couch.

4:15 pm

I am rewiring the three-way switch to get power to the porch light. The fan still works great. The porch light still does not. I am still cussing. Caren is still sleeping on the couch.

4:30 pm

I am re-rewiring the three-way switch to power the porch light. The fan still works great. The porch light still does not. Despite my loud cussing, Caren is still sleeping on the couch.

5:00 pm

I give up trying to power the porch light from the three-way circuit. I decide I will connect it to a different circuit at a later date. Caren is still sleeping on the couch.

6:00 pm

I begin assembling the fan. Caren has moved to the bedroom.

8:00 pm

The fan is assembled. It is mostly hung. All that is left is the trim piece that is supposed to sit flush against the ceiling. The trim piece does not sit flush against the ceiling. I am frustrated because I realize that I have to take the whole fan down, disconnect the wiring, and make adjustments to the ceiling box so that the trim will sit flush. I have given up on cussing. Caren is sound asleep in bed.

9:00 pm

I am installing the fan for the second time. This time the trim piece sits flush. Caren has stirred enough to use the restroom, but she is again sound asleep.

9:05 pm

My expensive wire strippers simultaneously arc and melt as I realize that I forgot to turn the power of before installing the fan for the second time. I cuss while Caren sleeps thru the light show.

10:00 pm

The fan is installed and I am ready to test it. The three-way switch does not work. I am very frustrated because I spent so much time on the three-way switches and the fan is controlled remotely. The remote is very cool, but it overrides the three-way switches. I will not have my three-way switches relegated to useless status. Caren continues to sleep.

11:00 pm

I am drinking beer. After having given up on trying to get the three-way switches to work with the remote, I have decided I am done for the evening. Caren still sleeps.

April 29th 2:00 am

I am laying in bed puzzling over the remote control. Caren is sleeping peacefully.

6:15 am

Caren thinks the remote control is the coolest thing since sliced bread. I am sleeping.

7:30 am

I am removing the receiver for the remote control unit from the fan. I am wondering how many times I will connect and disconnect the fan's wiring before I am done. Caren is disappointed that she doesn't get to have a remote control fan.

8:00 am

I am satisfied. The fan works, its accompanying light works. The hole is patched in the ceiling where the old fan used to be. The burn marks on the ceiling from my once-expensive wire strippers will be repainted soon. The siding is back on the house. The porch light will work again... someday. Caren is feeling much better.


The sum total of way too many hours of labor

Thursday, April 19, 2012

There's something I'm not very good at...

I feel confident banging nails, making cuts, laying tile... I've even developed some confidence with electrical work. But, when it comes to permits and paperwork, I am at a complete loss.  For some reason, I can't seem, or don't even know where, to get started on permitting. And, South Lake Tahoe is not the place to delve into construction without a permit. There's the TRPA, BMPs, Eldorado County, etc, etc. It seems like one needs to have permission from about six different sources before one begins construction... at least construction that is visible.  That is to say, construction that is outside.

All the work that is done inside the house one can hide. Nobody is gonna happen by and say, "Hmm, wonder if they have a permit for that."

To remove decks, to add decks, to re-roof, to re-side, even to lay paving stones one needs a permit.

Caren and I ventured down to the TRPA (Tahoe Regional Planning Association) the other day to see if we could find a place to start. The guy at the counter was friendly enough, even if he was in a hurry to get to lunch, but he wasn't a whole lot of help. He handed me a packet of papers that was about half an inch thick, mumbled something about four site plans, coverage, and $1008. Then he locked the door and went to lunch.

It seems that I need somebody to come out and survey the property to determine the exact percent of ground that we have covered. We also need to know what is legally existing and what was built on the sly. I guess that they use arial photos to determine such things.

My guess is that most of the decks and out buildings on the property are not legal. What that means as far as future plans, I have no clue.

What I do know is that I have to fill out about half an inch worth of papers, submit them to Eldorado County and pay somebody about a thousand dollars to come out and survey the property. After that I can apply for permits to make changes to the exterior of the house.

So, what all this means is that progress has slowed to a crawl on the project.

Instead, we've been pecking away at odds and ends on the interior...


I spent a day putting this Pottery Barn inspired easel together using scraps of barnwood that have been laying around in the garage. The couches fit together in such a way that they leave a rather large area of wasted space in between them. I didn't really want a bulky end table filling said space, so went with something light and airy instead. Both Kelby and my brother, Rob, have become pretty good photographers, so I figure that I will have some of their work enlarged and framed to display on the easel.


We also spent a day and a half milling the baseboard for the bedrooms. The floors are a little wavy in the extra bedroom, which meant that we had to do some custom work with the block plane to insure a tight fit between the floor and the baseboard. Painstaking, but the end product turned out okay. I'm excited, because I am almost finished with all of the barnwood trimwork.

We've also been picking away at the master bedroom closet, but are not finished yet, so no pics...

Right now, I need to spend a few minutes, err, uh, hours filling out a stack of paperwork for Eldorado County...

Monday, March 19, 2012

Snow

We have been extremely fortunate with the weather so far this winter. Warm, dry days have, until recently, allowed us to make slow but steady progress on the project. While there are still numerous tasks to complete on the interior, we've been able to complete enough of the work to have a suitable place to relax on the weekends. For the last month or so, we have been picking away at odds and ends and making progress... think closets and storage. We are also beginning to make plans for the exterior... think roofs and siding.

But, the weather has been a little less than cooperative of late. Instead of setting up saws and planers on the deck, we've been shoveling snow...


The weather provided nearly twenty inches of snow this past weekend. Caren and I took turns shoveling decks and walkways. We are fortunate to have friendly neighbors. Tom, in particular, seems to enjoy snow removal, so we are more than happy to indulge him when he fires up his snowblower and clears our driveway and the walkway to the house. What would have taken us around an hour to clear with a shovel, he clears in five minutes or so...


Our eaves are particularly adept at creating icicles. Any type of gutter system would be destroyed by the snow over the course of a winter, so our little house lacks gutters. When the heat is on in the house, or when the sun hits the roof, snow becomes water, which, in turn, becomes ice. Icicles three and four feet long are not uncommon.


Speaking of icicles... If you look closely at the pictures, you will notice that the ice is forming on the inside of the facia. Whoever built the roof and added the facia didn't think the process though very clearly. Instead of placing the facia under the roof decking, it was butted up against it. Which means that, in combination with a roof that needs replacing, water finds its way down the inside of the facia. Some of the roof decking is rotting under the eaves and will need to be replaced when we re-roof. Fortunately, the only leaking seems to be occurring at the eaves. Near as I can tell, there aren't any leaks over the living space.

The bad thing about snow is that it slows down progress on the project. The good thing about snow is that we get to do more of...


this...


and this...


and even a little of this!

Tuesday, February 28, 2012

This is for you, Judy...

A friend and coworker, upon reading my last post re boxes and crates, suggested that I make a hexagonal box. This one is for you, Judy...


Caren wanted cubbies in the closet for storing small odds and ends. I wasn't thrilled about the location that she chose for them... it messed with my fung shway.... but decided to build a prototype for her out of scrap that was lying around. Judy, if you count the sides you will see that I kinda half-@ssed it. But, Caren is happy. Now I have to build two or three more...