Thursday, July 26, 2012

Its the Little Things

Siding the house is not all that time consuming... the amount of time that Ive spent actually putting up siding pales in comparison to the amount of time I've spent prepping to put up siding.

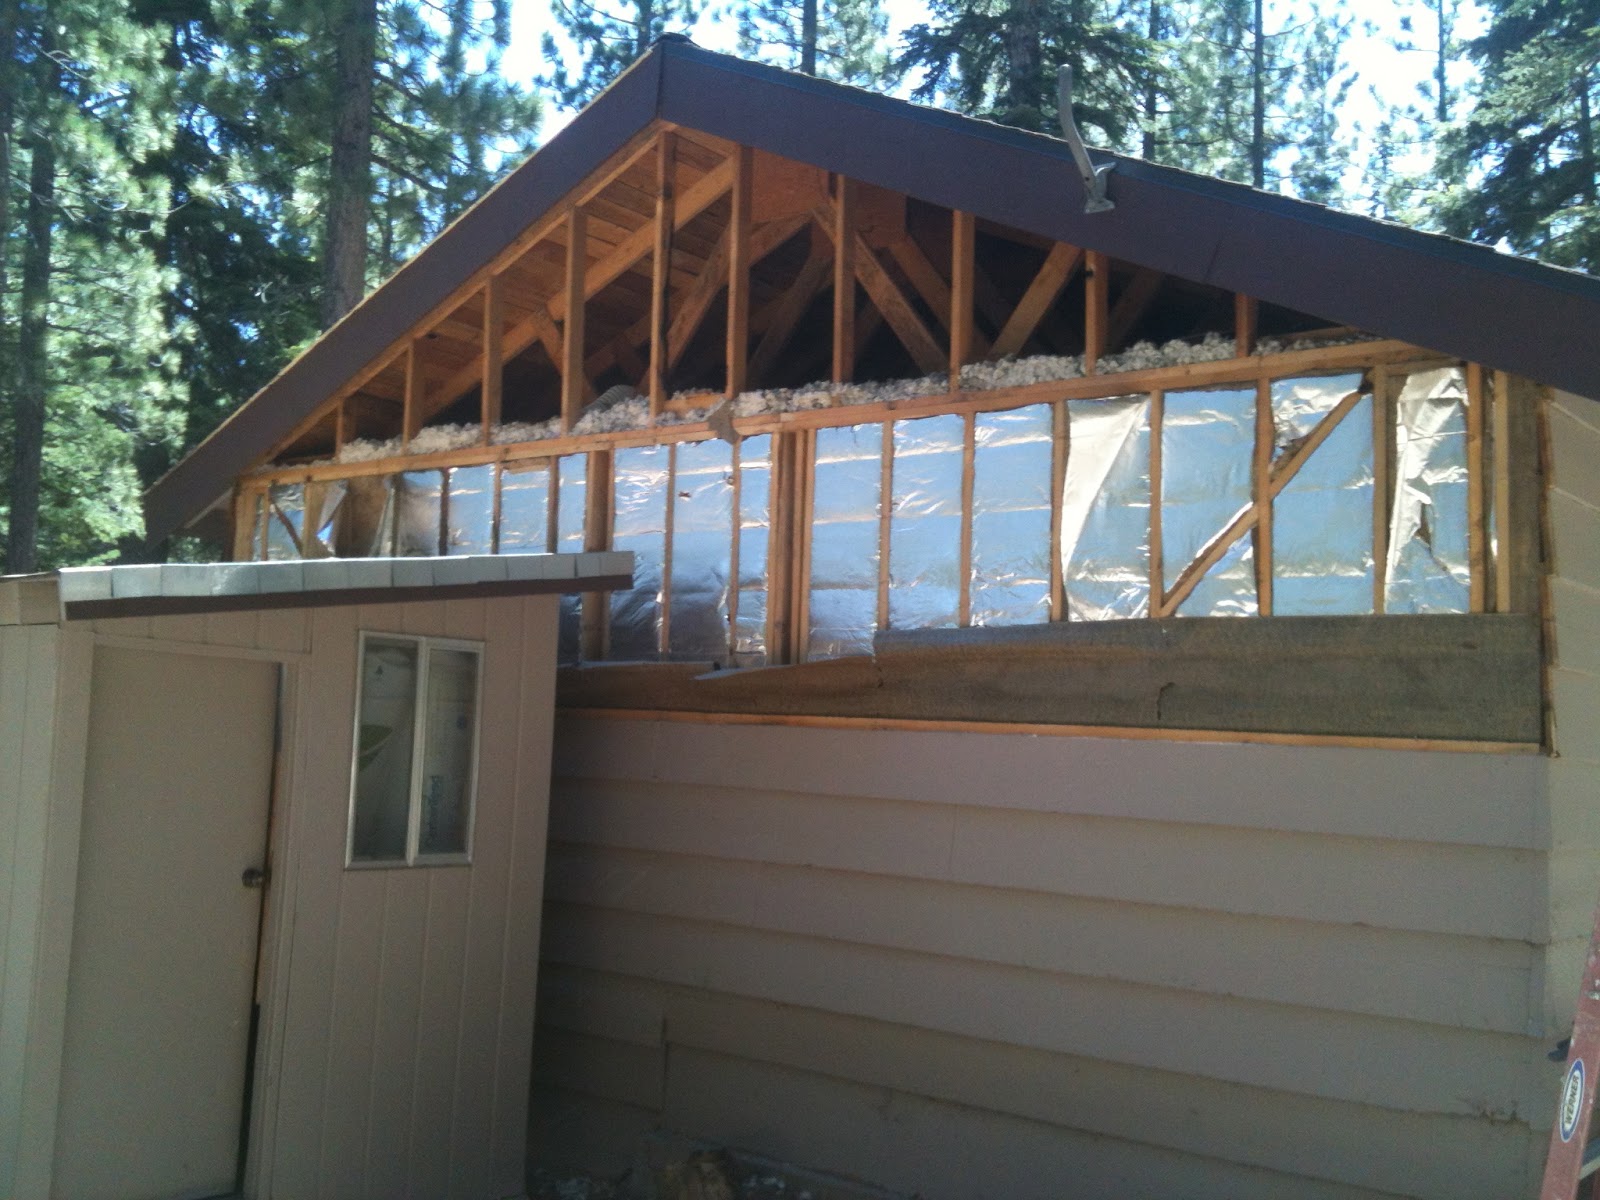
The other day Kelby and I replaced the freeze proof water faucet on the south gable end. It should have taken us maybe twenty minutes. It took us about four hours. We needed to extend the faucet about an inch and a half to accommodate the new siding. Freeze proof faucets come in varying lengths... ten inch, twelve inch, fourteen inch, etc. They also are threaded at the connection point and require no soldered joints to replace. In theory, all we had to do was take out the old one, replace it with one that was slightly longer and voila! I've learned over the past few months that theory and reality rarely match...


The faucet in question sits in what Kelby and I have affectionately nicknamed The Coffin Corner. It is the corner furthest from the crawl space entrance. There is barely enough clearance to lay on one's back without hitting the floor joists with ones forehead. There is not enough room to lay on one's side without hitting the floor joists. Fiberglass insulation hangs mere inches from one's face while one lays on one's back. Inches of powder-like dust that hasn't seen water in fifty years coats the ground. It is truly a hellish place. 

After crawling into the coffin corner to disconnect the old, too-short, faucet I realized that whoever installed it years ago completely rounded off the corners of the hexagon that the wrench grabs onto. Even with my largest set off channel locks I couldn't break the faucet lose from the death grip that the pipes had on it. Picture several trips back and forth, in the dust, on my belly to retrieve larger and larger tools. Picture hanging on a very large set of channel locks with all my body weight suspended off the ground. Picture much cussing and frustration. Picture me shouting to Kelby to bring the sawsall under the house...

Eventually we cut the pipe off, crawled out from the coffin corner, and headed to the hardware store to purchase a new, longer, freeze proof faucet and all the accouterments to repair the pipe we had cut.

Forty-five minutes later we were back under the house with a propane torch, solder, flux, a copper slip joint, and a new section of copper pipe. Remember, there is about eight inch of clearance in the coffin corner. Of course, the pipe that we cut with the sawsall was too rough to accept a new slip joint without leaking, so I planned to sweat it out at the nearest joint and replace it. There was nowhere close to enough clearance to spin a pipe cutter around it to clean up the end. Picture firing the torch up... picture the torch singeing the floor joist next to the pipe... picture lots of smoke in a confined area... picture a thirty foot belly crawl to get a foil pie plate to act as a heat shield. The heat shield protected the joist and saved me from burning down the house. Even so, it was difficult to hold the heat shield with one hand, heat the pipe with the torch in the other, apply solder with my third hand... oh wait, I don't have three hands. Maybe that is why the process was so difficult... that and the fact that I was trying to contort my body in such a way that I wouldn't have molten solder drip onto me despite the fact that I was working directly overhead in a space in which I couldn't even lay on my side.

An hour or so later I shouted to Kelby, who was right on the other side of the foundation the whole time offering words of encouragement and advice, that he could turn the water back on.

Ten seconds later I shouted to Kelby, who was still right on the other side of the foundation, that he better turn the water off because the new joint was leaking. I kinda figured that it would, given that I needed three hands but only had two.

Fifteen minutes later I shouted to Kelby, still right on the other side of the foundation, to turn the water on again.

Ten seconds later I shouted to Kelby to turn the water off... again.

The third time was the charm. I laid back on the ground, checked my watch and tried not breathe in too much dust or smoke while I waited for ten minutes to confirm that there were no leaks while the system was under pressure.

Then I made the thirty foot belly crawl to daylight... Yes, I still had a few minutes of daylight in which to put up siding now that I'd done the prep work.


Wednesday, July 25, 2012

Pioneer Log Siding

Over the winter, Caren and I waffled back and forth, to and fro on siding. One day we'd like tongue and groove cedar, the next we'd be considering board and batten. As springtime rolled around we began looking at D log. D log is basically 2x material that makes the house appear as if it is constructed using logs. We even went so far as to start collecting quotes. That's when Caren found Pioneer Log Siding.  

Richard Gunst and his wife, Chris, are true artists, turning run of the mill 2x material into beautiful, hand-hewn log siding. Be sure to click on the link above to check out his website. Then check out the pics below to see how Richard's material is turning our little house into a true mountain cabin. Both Richard and Chris have been fantastic thru the whole process, from ordering to staining to shipping to answering a myriad of questions. They have gone above and beyond with customer service... And Caren and I are totally stoked!


We've just about finished installing the siding. Thanks to Richard's tips, it was amazingly easy to put up. The process was a simple one. Install the trim around the doors and windows, install the corner posts, install the courses of siding, alternating with inch and three-quarter strips of plywood...


Well, maybe it wasn't quite so simple. First, Tom, the neighbor, volunteered to help us with his builders level. It took him all of about twenty minutes to "shoot" the house and snap a chalk line on it that would serve as our reference line. I'm so glad that Tom knows what he is doing. His twenty minutes made it super easy to insure that everything was level and plumb.

Then Kelby and I ripped half inch sheets of plywood into one and three-quarter inch strips to serve as spacers between each course of siding. The spacers serve two purposes... they make it easy to make minor adjustments in leveling the courses of siding, and they serve as a backer for the chinking that will go between each course. Each strip of plywood then gets covered by plastic packing tape. Kelby, Zach, and Caren all had a hand in applying the tape. The tape keeps the chinking from sticking to the plywood so that it is only stuck to the actual siding, thus allowing it to move, and stretch as the siding expands and contracts with weather conditions.


With the house "shot" and the plywood spacers taped, the next step involved putting up the trim and corner posts. If you look closely at the photo above, you might notice that the posts and trim sit about three-quarters of an inch proud of the siding. We wanted to add a little depth to the transitions so we furred them out using the original cedar siding that we removed from the house. A simple enough task after one re-mills all the boards to the appropriate size... table saw, planer, miter saw... three easy steps, if you don't count removing the nails, before we could install trim and corner.


And the there are always little problems like this one to deal with. The south gable end was a complete bear. All the electrical, water, and gas enter the house there... never mind the chimney. Someday soon I will document that whole process....


Then we got to install the actual siding. Each piece was screwed into place, top and bottom, every sixteen inches. That is a lot of screws... Upon Richard's recommendation, we used "headless" screws. Phillips makes a headless deck screw that fit the bill perfectly. They even make them in colors that matched our stain. One has to look really close to see that there are any screws holding the siding on at all...


Remember the repurposed corrugated metal we got from Jesse all those months ago? It is now wainscoting under our windows. I was worried about cutting the heavy gauge metal, but it turned out to be a not so difficult process. Just a metal blade for the jig saw and a lot of vibrations... picture Caren standing on the metal to hold it in place as I cut it. My arms were pretty much jello by the time we finished, as were her legs.


We still need to finish the shingles on the north gable and the top course of siding under the eave on the front, as well as around the front door. I simply ran out of time to finish the shingles before taking a much needed vacation... think flyfishing in BC. And we need to get the new covered front porch built before completing the siding on the front of the house. The good news is that the permit for that was issued just before I left for BC, so we are ready to go starting this weekend.

Friday, July 20, 2012

When We Last Left Off...

...we were about halfway through with the shear on the house. That seems like forever ago. I've spent the last month working dawn til dusk on the project. So much has changed that it is hard for me to remember it all.  I'll use photos to help jog my memory.


With help from Alex and Kelby, we finished the shear on the house and passed the inspection. But, not without a few struggles...

Before...
After...
We replaced a small transom window in the bathroom with a large slider. That meant new framing. During the process we also moved the header up an inch and a half so that the tops of all the windows and doors on the rear of the house would be level. Moving the header required creative use of a car jack, but removed the sag in the roof line.


We also replaced the bedroom window with a set of french doors. That required more framing, just not as extensive as the bathroom. The door actually was cut an inch and a half too long, so we had to remove the sole plate from the original framing to accommodate it. It took us most of the day, but we got'r done.

Before...
After...

The south gable end was my biggest fear. That is where the gas and electrical enter the house. I envisioned having to turn the gas off at the meter and the electrical off at the street, but it turned out to be much easier... by notching and sliding the shear we were able to wiggle everything into place without disrupting any services. The siding would not be so easy on the same end, but that is a story for a future post.

It all looks so simple on paper-- just slap up some OSB on the exterior and away you go... In reality, it involved re-routing electrical, re-plumbing exterior faucets, firring out wavy walls, cutting venting, replacing windows and doors, etc, ad infinitum. It took us the better part of a week and a half from start to finish. And I would still be pounding nails if it wasn't for neighbor Tom allowing us to use his framing nailer. With a 6 and 12 nailing schedule (one nail every six inches around the perimeter of each sheet of OSB and one nail every twelve inches in the interior of every sheet) there are somewhere in the neighborhood of three thousand new nails in the house.

But, like I said, the inspector liked our work and gave us the go ahead to start covering the OSB with actual siding...

Monday, June 25, 2012

Photo Dump

So, I have a problem... so much to blog about, but no internet connection at the house to do so.  School has been out for about two weeks, and I've spent most of my free time up at the house in South Lake. Lotsa goings on, but, like I said, no internet connection. I'm currently in Davis and have a free minute, but only a minute. So, I'm gonna dump some pics onto the blog and scribble off a few brief descriptions.


The shear and insulation for the siding project arrived a week ago last Monday. There wasn't any shear under the siding on the house, so this stuff has to go up before we re-side. At least the permit was easy to get...


The siding arrived a week ago last Wednesday. Unfortunately the eighteen wheeler couldn't deliver to the house. Instead, my dad and I had to off-load the siding by hand in the parking lot of an empty building; transfer it to a trailer that Caren's truck could pull; haul it all to the house; off-load it again... then return to the parking lot for a second trip to pick up the remainder that my mom had been patiently guarding. The siding is super cool... Quite possibly my favorite item that we've purchased for the project. More on that in a future post.


Finally got around to cleaning the bear damaged insulation out from under the house... We bought insulation to replace it a few months ago. It was on sale at the local hardware store for forty percent off. Now I just gotta find the time and the motivation to put it in the crawl space.


Started the re-siding project in earnest last Wednesday. The first step is tearing off the old. Then remove the old insulation. Then replace any damaged framing. Then replace the wiring. Then put in the new insulation...


... Then put up the shear--half inch thick 4x9 sheets of oriented strand board.


Gave the shed away for free to a couple of guys on Craigslist. According to the TRPA it wasn't legal coverage and it was easier to get rid of it then to go thru all the hassles and paperwork to make it legal. Anyways, the guys came with a sawsall and disassembled the shed then hauled it off to Markleyville in two trips. I think they were in a little over their heads, but they kept at it until the shed was gone and they had cleaned up any mess they made.


By Saturday last, Alex, Caren and I had shear installed on two of the four walls... We also replaced the windows in the living room and extra bedroom. This time, the windows were done right... no oh $h!t moment in the shower the next day.


Oh... we are more than half-way done with the sheathing because we also finished this half of the south wall.


But...  we still have this much to do... including replacing two windows and adding one set of French doors. Then, after the inspector comes to check our work, we can start putting up the actual siding.

Tuesday, May 29, 2012

And There Goes the Porch...

Last Friday night it snowed... maybe for one last time before summer sets in. Saturday morning Caren shoveled the front deck... definitely for one last time. By Sunday all of the snow had melted off, and summer had set in.

With the arrival of summer things are about to get busy. Siding has been ordered, the permitting process has begun. Big changes are afoot.


By midday Sunday the front porch looked like this. We had already removed nearly half of it before I remembered to snap a few photos. The porch had seen better days and was pretty much worn out. It didn't really fit into our plans. And, I had concerns about the construction. The ledger board (where the porch ties into the house) was attached to the siding instead of the framing. Somebody had tried to flash it to protect the siding from water damage, but mickey-moused the job. I had a sneaking suspicion that I'd find water damage when I removed the ledger board.


Sure enough I was right... and the carpenter ants liked the moisture to boot. Fortunately the damage is limited to the house rim on one corner. Neighbor Tom says it is an easy fix. And I sprayed the ants...


By Sunday evening all that was left of the porch was the piers. I fashioned a couple of steps out of paving stones that were laying around on the property when we bought the place.


Before we left for the Valley on Monday evening we'd removed all the piers and their accompanying footings. We also created a moveable temporary stoop out of the left over deck boards. When we get to siding the house, we will be able to move the stoop out of the way to complete the work, then replace it until the permits are issued that will allow us to build the front deck.

Tuesday, May 15, 2012

More Furniture...

Caren's mom and dad are coming to visit in a week or two. Mine are coming sometime in June. We needed some furniture... beds in particular... for the guest bedroom. We can get away with putting teenage and twenty something boys on blow-up beds, but somehow I don't think that moms and dads would appreciate air beds in quite the same way.

So, after scouring the internet for ideas, we set about making some furniture...


Home Depot supplied us with inexpensive lumber... 2 x 4s, 2 x 8s, 1 x 2s, 1 x 3s and a sheet of plywood. An hour or two of cutting and we were ready to sand and assemble. Sanding is very time consuming. When one purchases inexpensive dimensional lumber, one must sand a lot. Caren and I sanded for the better part of four hours.


The headboards and matching footboards went together quickly and easily.


We thought we'd try to match the finish on the interior doors; a combination of dark walnut and mahogany Watco oil. Caren spent several more hours applying the finish.


After a weekends worth of work, we had two beds. Neither Caren nor I were entirely satisfied with the finish.


Not the best of pics, but after another day of finishing, we were much happier with the new look. Caren still has stained cuticles, but she isn't as grumpy as she was when she was halfway through the second finishing.


We figured we needed a night stand to match, so I used scrap from the bed construction, as well as a few other odds and ends that were lying around, to create this matching piece. I'm kinda proud of it because it was entirely created from scrap, and, if you don't count the hardware, didn't cost a dime.


After an unsuccessful and frustrating shopping trip to Ikea, Walmart and Target, Amazon.com provided us with vintage quilts and matching bedding.


Caren did find the candle holder at Ikea, but the real story behind this pic involves a promise. Caren was so fed up with staining that I promised that I would stain the nightstand. I wasn't quick enough in honoring that promise, so Caren set about staining this piece too... and she was grumpy.


Grumpiness and shopping frustration aside, everything came together nicely. Hope the moms and dads like the results, even if they have to sleep in separate beds. We considered a full or a queen, but decided on twins because teenage and twenty something boys refuse to share a bed... even if it is a queen.  That, and the bedroom is pretty small.

Thursday, May 10, 2012

Fans

April 26, 07:30 pm

Caren finds ceiling fans on sale in Costco. Because the fan in the house is old, tired, and most of all, ugly,  we plunk down a few bills for one.

April 28 11:30 am

Caren suggests we install the fan. I cringe because fans should be easy, but I know that they are not.
Soon we have a new location on the ceiling picked out... one that is more centered in the room... Caren is standing on a stool with a drill. I am sitting in fiber glass insulation in the attic trying to locate the hole she has drilled.

11:45 am

The hole has been located. The tired, old fan has been removed. I am in the attic again with a keyhole saw, a crescent wrench, and a power drill. Soon I have the fan box relocated and am ready to start hanging the new fan. Caren is complaining of a headache.

12:00 pm

I remember that ceiling fans need electricity. Fortunately I have previously installed three-way switches to power the fan from opposite sides of the room. All I need to do is run one wire from the last switch on the three way circuit to the fan. Caren has a headache.

12:30 pm

The power is off at the fuse box. I am in the attic with wire cutters, wire nuts, pliers, and electrical tape. I am swimming in insulation. Caren is in the room below me with the wire fishing tool. We are having no luck running new wire from the switch thru the wall to the attic. I am beginning to get frustrated. Caren appears pale.

1:30 pm

We are both standing on the front deck pulling siding off the house to open up the wall and run the new wire. I am cussing. Caren is cringing.

2:00 pm

I am standing on the front porch putting siding back on the house after running new wire. Caren is falling asleep on the couch.

3:00 pm

I am in the attic connecting new wires. Caren is asleep on the couch.

4:00 pm

The wiring is connected, and I am testing the three-way circuit. The fan works great. The porch light does not. I am cussing again. Caren is still sleeping on the couch.

4:15 pm

I am rewiring the three-way switch to get power to the porch light. The fan still works great. The porch light still does not. I am still cussing. Caren is still sleeping on the couch.

4:30 pm

I am re-rewiring the three-way switch to power the porch light. The fan still works great. The porch light still does not. Despite my loud cussing, Caren is still sleeping on the couch.

5:00 pm

I give up trying to power the porch light from the three-way circuit. I decide I will connect it to a different circuit at a later date. Caren is still sleeping on the couch.

6:00 pm

I begin assembling the fan. Caren has moved to the bedroom.

8:00 pm

The fan is assembled. It is mostly hung. All that is left is the trim piece that is supposed to sit flush against the ceiling. The trim piece does not sit flush against the ceiling. I am frustrated because I realize that I have to take the whole fan down, disconnect the wiring, and make adjustments to the ceiling box so that the trim will sit flush. I have given up on cussing. Caren is sound asleep in bed.

9:00 pm

I am installing the fan for the second time. This time the trim piece sits flush. Caren has stirred enough to use the restroom, but she is again sound asleep.

9:05 pm

My expensive wire strippers simultaneously arc and melt as I realize that I forgot to turn the power of before installing the fan for the second time. I cuss while Caren sleeps thru the light show.

10:00 pm

The fan is installed and I am ready to test it. The three-way switch does not work. I am very frustrated because I spent so much time on the three-way switches and the fan is controlled remotely. The remote is very cool, but it overrides the three-way switches. I will not have my three-way switches relegated to useless status. Caren continues to sleep.

11:00 pm

I am drinking beer. After having given up on trying to get the three-way switches to work with the remote, I have decided I am done for the evening. Caren still sleeps.

April 29th 2:00 am

I am laying in bed puzzling over the remote control. Caren is sleeping peacefully.

6:15 am

Caren thinks the remote control is the coolest thing since sliced bread. I am sleeping.

7:30 am

I am removing the receiver for the remote control unit from the fan. I am wondering how many times I will connect and disconnect the fan's wiring before I am done. Caren is disappointed that she doesn't get to have a remote control fan.

8:00 am

I am satisfied. The fan works, its accompanying light works. The hole is patched in the ceiling where the old fan used to be. The burn marks on the ceiling from my once-expensive wire strippers will be repainted soon. The siding is back on the house. The porch light will work again... someday. Caren is feeling much better.


The sum total of way too many hours of labor